The primary reason for this is pretty simple. While it's easy to pan, zoom and orbit your model view around in LayOut until it's exactly right, there's no easy way to save that view in case you need to come back to it later. If there's a particular camera angle you want to use in your LayOut doc, it'll save you time in the long run to open the model in SketchUp and create a scene with the view you want.
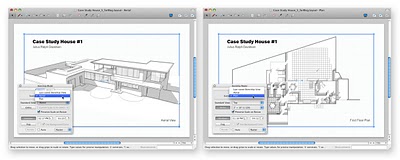
Follow these steps to associate a scene you've created in SketchUp with a model viewport in an existing LayOut file:
- In LayOut, right-click on a model viewport and choose Open with SketchUp from the context menu.
- In SketchUp, use the navigation tools to frame the view you want.
- Add a new scene to your model (View > Animation > Add Scene).
- Save your model.
- In LayOut, right-click on the model viewport and choose Update Reference from the context menu.
- Make sure the model viewport is selected, then open the SketchUp Model dialog box (Window > SketchUp Model).
- In the "Scene" drop-down menu, choose the scene you created in Step 3.
Voilà! Your scene is now associated with your model viewport.
Using section cuts in LayOut
There are a few situations when you MUST use SketchUp scenes in combination with LayOut viewports. One of these involves section cuts. Because you can't create, activate (or de-activate) section cuts directly in LayOut, you have to set up scenes to be able to make use of them*.
In this example, I've modeled J.R. Davidson’s Case Study House #1, and I want to create a two-page LayOut doc as a presentation file. The first page will show a bird's-eye perspective; the second page, a first-floor plan. I use a horizontal Section Plane to produce the plan view (see below).
Still in SketchUp, I save a scene for each of the two views I want to present in LayOut:
In LayOut, I create a two-page doc and insert the CSH#1 model on each page. Using the SketchUp Model dialog box, I assign one scene to each of the two viewports (one on each page).
*It’s technically possible to show/hide section cuts in LayOut by making clever use of Styles, but even that has its limitations. Section cut visibility in Styles is either on or off; as soon as you add two section planes, you’re back to needing Scenes. For this reason, I prefer sticking to Scenes all the time -- it’s simpler and it works all of the time.
Posted by Aidan Chopra, SketchUp Evangelist


0 comments
Post a Comment