Showing posts with label Best Practices. Show all posts

Thursday, September 13, 2012

Modeling SketchUp roofs on a click with Build Edge PLAN

If you’ve ever taught someone to use SketchUp, you’ve probably drawn the basic SketchUp house and then breezed over the details when it comes to detailing the roof. The truth is that designing roofs is not always a straightforward task, even for experienced modelers.

We’ve explored some solutions for boosting roof design productivity on this blog, and today we’re happy to share a new plugin, Build Edge PLAN, that employs a bit of BIM for quickly creating dynamic walls and roofs. Here’s a quick look at how it works, courtesy of Aaron from Build Edge:


If you couldn’t sit still for the video, here’s the skinny: Build Edge PLAN plugin makes it easier to...

Draw Walls: Rather than outlining walls in a 2D view, and using Push/Pull to extrude them to full height, PLAN can draw complete 3D walls based on your desired dimensions. Each wall can be input as quickly as drawing a single line.

Edit Walls: Even if you are precise when it comes to grouping objects and creating components, modifying walls in an existing structure can be a trying process. With walls created by BuildEdge PLAN, you can move one wall, and all of the attached walls (not to mention the roof) will stretch to stay connected.

Model Roofs: Modeling a pitched roof in 3D is not a straightforward task. Properly projecting surfaces so that they intersect each-other to form a proper roof is time consuming, and if you want to model for framing, including proper heel heights and overhang geometry can be a challenge. BuildEdge PLAN simplifies the process by generating roof geometry from a simple roof outline. Just specify the slope and heel geometry of each side of the roof, and the plugin does the heavy lifting. PLAN also lets you set properties of each roof side individually, so there is plenty of wiggle room for customization.

Roof Creation in Build Edge PLAN: Roofs are created by outlining their profile; selecting individual sections allows for customization

Edit Roofs: Since BuildEdge PLAN recognizes walls and roofs as they are input, you can modify the house as a whole, and move walls or change properties of a roof on the fly. This allows you to quickly change the look of the entire house or any individual properties. For instance, switching from a hip to a gable is literally a single click.

Currently, Build Edge PLAN is only available for PC (a Mac version is in the works). The folks at Build Edge have some quick tutorials to get you going and are pretty great about helping modelers to get the most out of their plugin; give it a try, and the next time you teach someone SketchUp, don’t skimp on the roof.


Posted by Mark Harrison, SketchUp Marketing

Tuesday, August 7, 2012

Save the date for 3D Basecamp 2012

If you sometimes try to orbit the spreadsheet you're working on, you're one of us. If the phrase "Follow Me that profile along this edge" makes sense to you, you're one of us. If building a model is easily the best part of your workday, you're one of us. We're people who really, really like SketchUp, and every couple of years, we get together to meet, learn and be inspired.

The fourth-ever SketchUp 3D Basecamp is scheduled for October 15, 16 and 17 of this year. It's happening in our hometown of Boulder, Colorado, and everyone's invited. We haven't ironed out all of the details yet, but we thought we'd let you know so you can mark your calendar. It's the most fun you'll have this year.

Want us to let you know when more information is available? Click the red button!

The video below is a recap of the goings-on from our last 3D Basecamp in 2010. As you can see, a great time was had by all:


Thursday, July 26, 2012

Announcing the Madrid SketchUp Plugin Conference

When someone writes a plugin for SketchUp, he or she isn’t just looking to cram a few more icons into your toolbar. Plugins help users solve important design and workflow problems, so plugin developers have to be as keyed into the needs of SketchUp users as we are. Our Ruby API is a canvas, but it is the ingenuity of developers that makes the plugin community truly remarkable.

Today, I’m happy to announce that Íscar, the Spanish SketchUp Pro reseller and Authorized Training Center, is hosting the first-ever SketchUp Plugin Conference this fall.

The details:
Íscar’s conference will take place September 5th - 7th, 2012 in Madrid, Spain. The event is focused on the needs of plugin developers, distributors and resellers, though it’s open to everyone. The conference will be a venue for developers to present their plugins, share tips with other plugin authors, and even find new distribution channels for products. Users will see demos of the latest and greatest plugins, and have a chance to compare notes with people from around Europe and the rest of the world.

This conference is not being organized by the SketchUp team but we are co-sponsoring it, and a few of us will be in attendance. We may even cook up a presentation or two.

Register for the conference here. Questions? Check out this FAQ.

Posted by Chris Cronin, SketchUp Business Development

Monday, July 9, 2012

SketchUp Pro Story: Bob Lang, Woodworker

Robert W. Lang is executive editor of Popular Woodworking Magazine, and the author of several books including “Woodworker’s Guide to SketchUp.” Bob blogs about Woodworking and SketchUp at his website ReadWatchDo.com. We asked him to tell us a little bit about his process and why he uses SketchUp Pro.

Building furniture is a rewarding process. Most of the challenge is problem solving; time in the shop is always in short supply and quality materials aren’t cheap. Good problem solving at the start allows a more efficient build and prevents costly mistakes.

The efficiency of SketchUp means I don't spend as much time designing and planning as I used to, which gives me more hours in the shop. Those shop hours are also better because I have a reliable reference that answers almost any question that might come up while I build. (Except for “where did I leave my pencil?”) I can concentrate on the physical work without being sidetracked with an hour or two of head scratching to solve a design or engineering problem

Early in my career, I fancied myself a designer and vowed to only create original designs. Then one day I read something from Gustav Stickley to the effect that if you wanted the ability to design new work, you needed to thoroughly understand everything that had been done before. Twenty-five years later, my work is mostly reproducing designs from the Arts & Crafts period of the early 20th century. This chair (below) is a Stickley piece, and despite its simple appearance there are a lot of subtleties to the overall design. These quirks are what make this furniture intriguing—the closer you look, the more you find.

When I'm planning a reproduction, I work a lot from photographs. My process is mainly the same one I used years ago with pencil and paper. Importing a photo, scaling it to actual size and measuring the photo on screen are far easier (and more accurate) than staring through a magnifying glass and using a proportional rule.

If possible, I work from photos I've taken myself; these are different than photos taken for publication. I'm looking for information, and the best source of that is a straight-on view. I'll do some things in Photoshop, sometimes correcting for lens distortion, but mostly I adjust the image to make it easier to discern details.

After I import a picture into SketchUp, I scale it so that parts I can measure with the Tape Measure tool match known dimensions. I place the images on a separate layer, so I can easily turn them off and on as I build the model. I usually build the model near the photos, but for some parts I work on top of them. To get the outline of the corbel under the arm, I traced the shape on top of the image, then extruded it to the proper thickness with Push/Pull.

I import photos into SketchUp and scale them to a known dimension. Sometimes I model next to the photo, and sometimes I trace directly over the photo.

Sometimes the photo will reveal something I'd rather not see. The next image is from early on in the process, right before I discovered that the lower rail between the front and back legs isn't parallel to the floor, as I have it in the model. That slight angle adds a lot to the appearance of the finished chair. It's the chair's way of saying “Come and have a seat!”, but it makes building the side assemblies considerably more difficult. Instead of five identical vertical slats, each one is a bit longer than its neighbor. Additionally, the shoulders of the tenons have to be cut at an angle rather than square.

With the photo available within the model for reference, I can check dimensions and details while I work. In this case I realized my first attempt missed an important but subtle detail.

Eventually, I have a model that I'm happy with; I consider this the halfway point of the process. The second half is extracting information from the model. Everything I want or need to know about every part of this chair is there on screen. Now the task is to pull out the information I need (or want to show someone else) and to put it a manageable form.

In the shop I tend to spread out until the project I'm working on covers every available horizontal surface. I follow much the same process when working in SketchUp: I make copies of the entire model (or portions of it) off in empty space somewhere to serve different functions. I create scenes for each of these views, with layers for dimensions, so I can export or print only that portion of the model. If you back up and look at everything, it's pretty chaotic.

Zoom Extents makes it look like I’ve made a horrible mess, but I generated several scenes in a short period of time, each showing important details by copying portions of the model and moving them into empty space.

That said, each scene has a lot of value; there are a number of ways scenes can be used. In my work on books of measured drawings and for Popular Woodworking Magazine, scenes are exported to Adobe Illustrator to use for two dimensional drawings (plans, sections and elevations) or three dimensional exploded views.

This is a typical Scene that I will print and take to the shop to use as a reference for each part of a complex assembly. The model contains precise information about every part, and if I forget to print a dimension I’ll fire up the laptop, open the model for a closer look and measure the parts in the model.

For a project build video, I exported an animation of several scenes and used that clip in the finished video to explain the construction process. For my own use in the shop, I print 3D views of groups of parts and stages of the process for reference. For the side assemblies of this chair, I printed exploded views as well as details such as the image of the leg joinery. In SketchUp, it doesn't take long to create these extra views. So far, when I wonder “Can I do this with the model?” the answer has been, “Yes I can, it works very well, and it doesn't take very long”.

Instead of standard cutlists, I create views such as this to accurately lay out the parts. It might take 5 minutes to drag each leg out of the Components window and add dimensions, and it saves hours in the shop. It’s surprising how close this is to having real parts to refer to.

One unexpected benefit of using SketchUp is that it turns out to also be a great tool for teaching woodworking. Unlike a valuable antique, a 3D model can be taken apart to study how it goes together. When I teach a class on building a piece for real, one of the main lessons is the sequence of doing the work. This is a crucial skill for successful building; knowing which parts to layout and cut first, how those first parts affect the following parts, and how to group parts together in sub-assemblies to make the final assembly simple. With a good model, an inexperienced builder can work all of that out before getting to the shop, learn the lesson in less time and not risk wasting valuable materials or shop time. The boost in confidence from this makes a significant difference in both the quality of the time spent building and in the quality of the finished product.

Reproducing a Stickley Morris chair is a lot of work, but there is a built in reward when the job is done.

Over the last 30 years, I’ve invested a considerable amount of money in tools to do my job. A large portion of that has been spent on computer hardware and software. Looking back, the best investment has been the money I spent on SketchUp Pro. I started using SketchUp thinking it might be an effective drafting tool, but it's turned out to be much more than that. This simple-to-use software program is the best thing I’ve found for all phases of design, engineering, planning and communicating.

Friday, March 23, 2012

'Save a Copy As' is my new favorite command

Every time I talk to Mitchel Stangl, I learn something new. Mitchel’s a mechanical engineer who uses SketchUp Pro to build massively intricate models of processing and manufacturing facilities. On his last visit to SketchUp HQ, Mitchel helped me improve my workflow by telling me about the File > Save A Copy As… command (which we apparently added at his suggestion).

When I’m working on a big model in SketchUp, I like to save a new copy of my file every few hours. Doing so lets me easily go back to a previous version in case I’ve accidentally deleted something I need — this happens more often than I care to admit. It also provides a measure of protection against file corruption, which isn’t common, but can be devastating.

For the last eight years, I’ve been choosing File > Save As… and creating a numbered copy in the folder that contains my project. The result is a long, long list of sequentially numbered files. The most recent is the one with the highest number appended to the end, as you can see in the screenshot below. Simple, no?

Using File > Save As... to create a sequential archive of files is straightforward, but there's a more efficient way to work.

There are two problems with this system (as I’ve come to find out the hard way): First, when I come back to a project after a hiatus, I’m never 100% sure that I’m working on the latest version of my file. Maybe I saved a newer version somewhere else? Second, when I’m working on a set of drawings in LayOut, the linked SketchUp file always needs to be the most recent one. Every time I change the name of the SketchUp file (three or four times a day), I need to manually re-link the new model to my LayOut file. Yech.


If you periodically "Save As" your SketchUp model with a new version number, the workflow with LayOut is awkward. You'll spend a lot of time relinking your current model to your LayOut file.

Using the Save A Copy As… command (instead of Save As…) takes care of both these issues. It lets you save a version of your model as a new file without renaming the one you’re working on. The saved versions can be numbered and archived, but the “master” version is always called the same thing. There’s no confusion about which is the latest, and working with LayOut is twenty times easier. Presto.

Choosing Save A Copy As... allows you to save "snapshots" of your model while continuing to work on the same file. I like to keep an archive of old versions in a separate folder, just to keep things tidy.

I love it when answers to complicated problems are so simple. Thanks Mitchel!

Tuesday, November 22, 2011

Getting a better view of small interior spaces

When you’re modeling a small room, it can be a pain to see what’s inside. The problem is that the walls and ceiling get in the way. One solution is to lop off the ceiling and work in a top view, dollhouse-style. Other folks set up scenes from the interior corners and adjust their Field of View to something super-wide like 90 degrees.

Looking at a small interior space from the outside isn't very rewarding.

Deleting the ceiling and switching to a top view is useful, but fiddly.

Standing in the corner and making your Field of View really wide is just weird. What are you—a housefly?

Both of the above techniques work—to a point. Personally, I think it’s like trying to read a book through a keyhole. By far my favorite method for working on small interiors is to make use of SketchUp’s ability to have faces with different materials on each side:

The face separating Susan and Sang is yellow on one side and green on the other.


Creating a completely transparent material and painting the green side makes it see-through.

The Entity Info dialog box shows that the selected face is yellow on the front and see-through on the back.

By painting the outward-facing surfaces with a see-through material—one whose opacity is set to 0%—I can see in from the outside. Super useful, super simple.

Here, I painted all of the outward-facing surfaces with a transparent material. Notice that the interior surfaces still look opaque?

Orbiting around my model, I can see through all of the walls. I can even see through the floor.

Friday, October 21, 2011

The right way to use Follow Me

When it comes to using the Follow Me tool, most folks have it wrong. There are actually two different ways to use Follow Me, and for complex extrusions, one works way better than the other.

Follow Me: The Hard Way
In most cases, the wrong way to use Follow Me is to activate the tool, click the face you want to extrude, and attempt to drag it along a set of edges. For complicated extrusion paths, this can be painfully inefficient.

Follow Me: The Right Way
Next time you need to extrude a face along a path, use Follow Me this way:

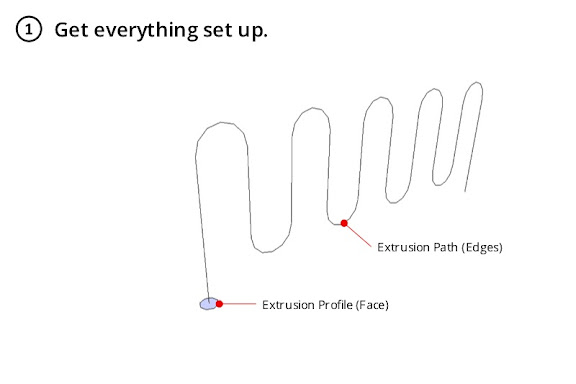
  1. Make sure your extrusion profile (a face) and your extrusion path (one or more edges) are set up the way you want them to be.
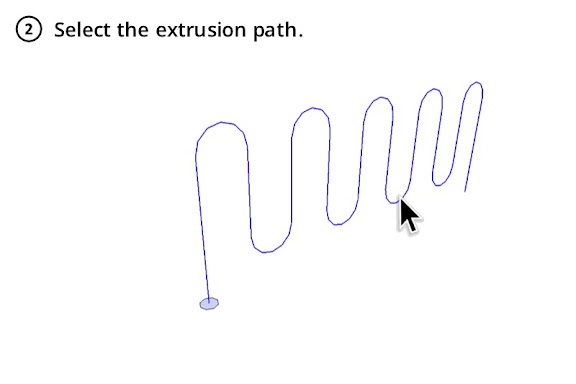
  2. Select (with the Select Tool) the edges that make up the extrusion path you want to use.
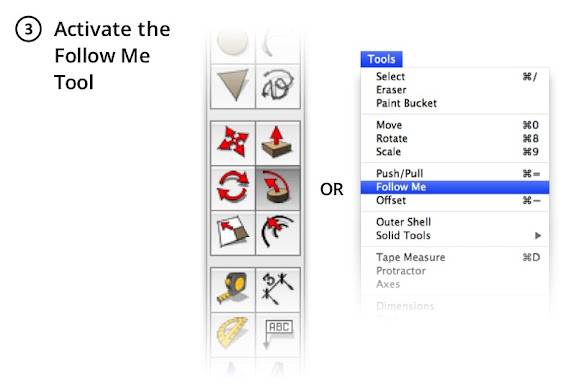
  3. Activate the Follow Me Tool by clicking its icon or choosing Tools > Follow Me. When you active Follow Me, the edges you selected in Step 2 will appear to deselect; they won't be highlighted anymore. Don't worry, though -- they're still selected.
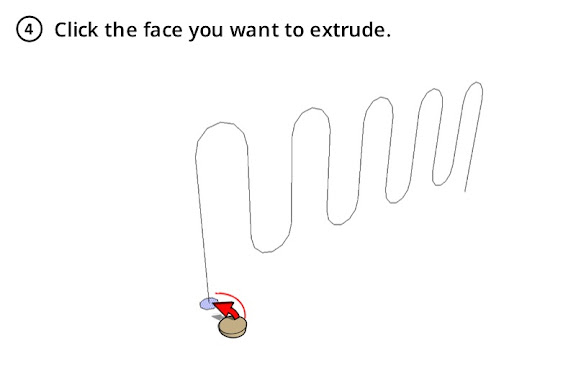
  4. Click (with the Follow Me Tool) the face you want to extrude.
  5. Everything happens in a flash. Voilà!


That’s all there is to it. You can take your time selecting exactly the edges you want. You can orbit, zoom and pan in order to select a complex three-dimensional path. No more cussing and sweating while you try to get the extrusion to go exactly where you want it to. Sometimes a little knowledge can save a lot of headache.

Tuesday, October 4, 2011

Speed Up SketchUp: Use Fast Styles

You might not realize that the display settings you choose to apply to your models can affect SketchUp’s speed and general responsiveness. Turning on fancy edge effects and other doodads will slow you down when your model gets big.

When you’re working on a big model, you want to make sure that you’re using a style whose Edge Settings panel looks like the one in the image below. Everything but "Edges" should be turned off.

The Face Settings panel is where you can choose not to display Transparency. When Transparency is turned on, SketchUp has to redraw your model on the screen several times—each time you change your viewpoint. If you don’t need to see through your windows just now, opt to temporarily view these faces without transparency.


The Background Settings panel is handy for turning off Sky and Ground, both of which cause your computer to do extra thinking while you’re working.


Unless you absolutely need them, you should use the checkbox in the Watermark Settings panel to turn off Watermarks.


The only toggles in the Modeling Settings panel you really need to worry about are the ones for Hidden Geometry and Section Planes. Obviously, you shouldn’t have wither of these displayed if speed is what you’re aiming for.


Once you’ve configured your own fast style, you should save it. Just give it a new name (I suggest “Fast Style”), hit Enter, and click the Create New Style button in the Styles Browser. You new style is saved in the "In Model" collection of styles, which is only associated with the model you’re currently working on.


Incidentally, almost all of the choices in SketchUp’s Default Styles collection are so-called “Fast styles” — their Edge Display settings are already configured for speed. Choosing any one of these styles will switch off extraneous effects.


Make a Fast Scene

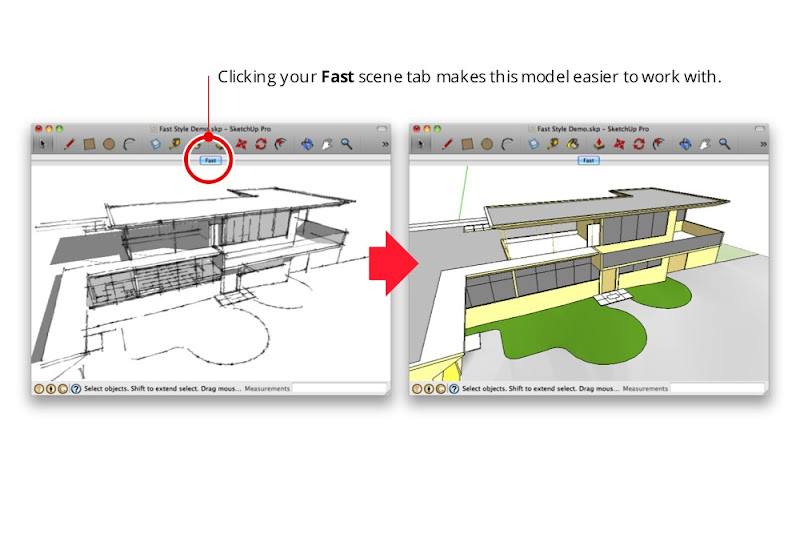
True SketchUp whizzes invariably go one step further and add a special “Fast” scene that they can activate whenever they need to. Rather than having to mess with the Styles Browser every time they want to activate their Fast Style, they just click a scene tab at the top of the modeling window. This Fast scene is usually set up to do three things: Switch to a Fast style, turn off Shadows, and turn off Fog.

Follow these steps to add a Fast scene to your model:

  1. Apply a Fast style to your model by choosing it from the Style Browser’s Select tab.
  2. Make sure Shadows and Fog are both turned off. These toggles are in the View menu.
  3. Choose Window > Scenes to open the Scenes Manager.
  4. Expand the Scenes Manager by clicking the Show Details button in the upper right corner.
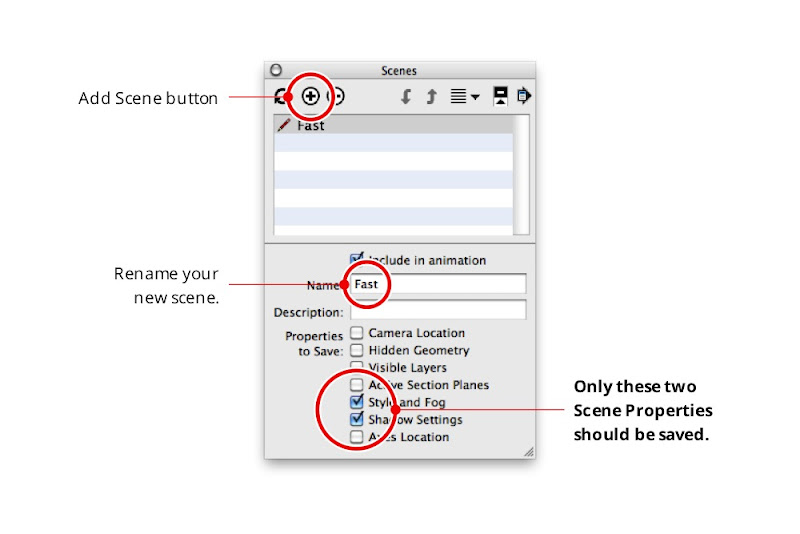
  5. Click the Add Scene button to add a new scene to your model.
  6. Rename your new scene “Fast” (or something similarly descriptive) and hit Enter on your keyboard.
  7. Make sure that only the “Style and Fog” and “Shadow Settings” checkboxes are selected in the Properties to Save section of the Scenes Manager.

From now on, all you have to do is click the "Fast" scene tab when you want to improve SketchUp's performance. Instant productivity boost!

Wednesday, August 17, 2011

Speed Up SketchUp: Extrude curves with fewer sides

The most sure-fire way to mitigate your model’s geometric complexity (its count of faces and edges) is to pay attention to extruded circles and arcs. Experienced modelers know that curves in SketchUp are actually constructed out of multiple, straight edges. By default, circles have 24 sides and arcs have 12 sides. Zoom in and you’ll see what I mean:

By default, circles you draw in SketchUp have 24 sides.


Arcs you draw in SketchUp are 12-sided by default.


When you extrude a default, 24-sided circle with the Push/Pull tool, you create a cylinder with 26 faces. Choosing View > Hidden Geometry shows the smoothed edges between the faces:


Turning on Hidden Geometry shows a default cylinder for what it really is: a 24-sided extruded polygon.


Using two default arcs and the Follow Me tool to create an fancy bullnose along the perimeter of a rectangular countertop yields no fewer than 90 new faces:


Using the Follow Me tool to extrude compound curves made out of default, 12-sided arcs results in seriously high polygon (face) counts. Thumbs-down -- this is bad SketchUp practice.


Modeling a simple bike rack using a combination of 24-sided circles, 12-sided arcs and Follow Me, then placing ten of those bike racks in your design, adds more than 86,000 entities (faces and edges) to your model. Oof.


A single bike rack made by extruding a 24-sided circle along a path made from 12-sided arcs. Unless you're designing the bike rack itself, there's no call for adding this much geometry to your model.


A close-up of the high-polygon bike rack. Individual faces and edges are made visible by turning on Hidden Geometry. Images like this one cause expert SketchUp modelers to have nightmares.


The Solution


To dramatically reduce the amount of geometry in your models, change the number of sides in your circles and arcs before you extrude them into 3D shapes. It’s easy:

1) Create a circle or an arc using the appropriate tool.

2) Before doing anything else, type “6s” and hit Enter.

This tells SketchUp to draw the curve you just created using six sides. The “s” tells it that you’re changing the side-count and not the radius. Of course, you don’t have to choose six sides — you can type in any number you like.


Change the number of sides in the circles and arcs you draw. I know, I know -- a hexagon isn't a circle. Suspend your disbelief in order to have usable models.


Note: Once you’ve manually changed the number of sides in a circle or an arc, every subsequent circle or arc you draw will have that same number of sides.

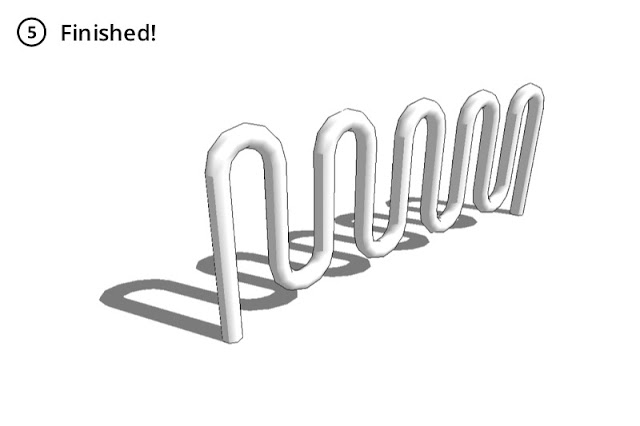
I modeled the bike rack below using 5-sided circles and 6-sided arcs. It only has 322 faces -- an 89% reduction over the bike rack I modeled using curves with the default number of sides.


Crafting a bike rack by extruding a 5-sided circle along a path with 6-sided arcs yields a perfectly usable model with substantially fewer faces and edges.


When it’s used as context in my model, can you tell the difference between the “high-poly” (geometrically heavy) and low-poly versions? I thought not.


Is the quality difference between the high-polygon (top) and low-polygon versions of the bike rack worth making your model twice as heavy? Nope.


Sunday, August 7, 2011

Assigning materials to groups and components

Everybody knows that faces in SketchUp can be painted with different materials. What lots of folks don’t know is that you can apply materials to groups and components, too. The following illustration shows the Entity Info dialog box, which is a great place to see which materials are applied to your geometry.

The Entity Info dialog box (Window > Entity Info) shows thumbnails for the materials assigned to selected entities. When you select a face, it shows thumbnails for the front and back sides of that face (top). Groups and components have material thumbnails, too (bottom).

When you paint a group or component red, only the faces inside it that are painted with the Default* material turn red. Faces that have already been painted with another material don’t change at all.

The above group (top) includes faces that are painted with different materials (bottom). Only the top face is assigned the Default material.

Applying a material to the entire group only changes the color of faces that are painted the Default material.

This trick also works with groups and components that are nested inside one another. When you apply a material to a top level group or component, all the Default-colored faces that are inside nested, Default-colored groups and components inherit that material automatically. The following diagram is my best attempt at a visual explanation of this phenomenon.

Applying a material to a group or component that in turn contains sub-groups and component instances can be a confusing experience. Just remember that the color you’re painting “trickles down” to Default-colored faces contained within Default-colored groups and components. It’s easier done than said : )

*SketchUp automatically applies the Default material to faces you create from scratch. You can also paint anything with the Default material at any time; just pick it in the Materials Browser (which looks completely different on PCs and Macs.)

The Windows and Mac versions of the Materials Browser. On the former, the Default material is included as a permanent thumbnail; on the latter, it’s the first material in the “Colors In Model” list.

As you can see, this technique is a godsend for building complicated objects that need to change color easily. In the case of the George Nelson Marshmallow Sofa in the images that follow, the cushions are individual component instances nested inside the main Sofa component. These are assigned the Default material.

I downloaded this George Nelson Marshmallow Sofa component from FormFonts.

The individual cushions are instances of the same component. Each instance is assigned the Default material.

The faces that make up the surface of each cushion are also painted with the Default material.

All of the metal and rubber frame pieces are also groups and components, but their faces are all assigned specific materials.

The faces in the non-cushion parts of the sofa are all assigned materials other than Default.

When you use the Paint Bucket to paint a color—in this case orange—on the main Marshmallow Sofa component, only the cushions take on that color. Everything not assigned the Default material stays exactly the way it is.

Painting the sofa component orange causes all Default-painted faces to turn that color. Non-Default-colored faces remain unchanged.

Related Posts Plugin for WordPress, Blogger...