In mid-July of this year, intrepid world travelers John, Shara and Steve headed east to join Sophie Feng (one of our newest SketchUp team members) on a mission to learn more about folks in China are using our software. Here's a travelogue that Sophie put together to describe the trip.
When a journey begins, you generally have no idea how it’s going to end. The small talk that seems insignificant turns into a great inspiration. The strangers from another country you only knew by name become your friends, while the colleagues you just met become your family.
In June, we talked by Skype about a trip to visit SketchUp users in China, planned it, then worked toward making it happen. Despite that, I doubt my dear colleagues knew how long it was going to be until we were sitting in a prestigious architectural firm the first day they arrived in Shanghai.
July 9th: Shanghai EC Architectural Design & Planning Co. Ltd.
Users presented to us how they use SketchUp in their workflow. They showed off their design skills by making a beautiful SketchUp animation for us. A local government official also was invited to join the "SketchUp Dialogue".
John really enjoys drawing on the wall.
July 10th: Better SketchUp, Better Design at the Shanghai Salon
Many designers, mostly young, came to the event filled with hope. They were enthusiastic, intelligent, idealistic, and joined us from all over China (Beijing, Shanghai, Suzhou, etc.) One interior designer even came all the way from Taiwan to share his SketchUp ideas with us.
Our users tell their stories one by one.
We were curious as to how these young designers use SketchUp for such large projects, which are actually fairly common in China. One thing that was very important to all those at the salon: They really want to make sure that SketchUp would not change too much after the transition from Google to Trimble. One of the most impressive presentations of the day was a local developer's "BIM for SU”. One of our users developed a series of plugins for SketchUp that completed a specific BIM workflow.
On a yacht in Huangpu River, Shanghai. From left: 王韶宁 wang shaoning, developer (Beijing); Steve Dapkus; 潘毅 Panyi, Landscape Architect; 钟凡 Zhongfan, SketchUp-BIM user (Guangzhou); John Bacus; 陈建良 Chen jianliang, interior designer; 刘新雨 Liu xingyu, Urban Planner (Beijing).
July 10th & 11th: Wuhan
This was our first visit to a famous Chinese university: HUST (Huazhong University of Science & Technology) is the only institution to offer a Masters degree for BIM qualification in China. Professor Luo (the College President) told us that there were 8,000 construction sites in Wuhan last year. There's no doubt that BIM has a great opportunity in China, as does SketchUp’s role in a BIM workflow. My colleagues John, Steve and Shara found themselves feeling hopeful at this leg of the trip, against all odds due to jet lag, 43 degree Celcius heat and 90% humidity.
As the first national research Lab in China, HUST is glad to get new ideas from SketchUp as a BIM tool. In the afternoon, another interesting salon was waiting for us.
Our new friends shared lots of interesting thoughts with us. Shara looks better after she's had some coffee.
July 13th: Guangzhou
On our way to Guangzhou University, The U-BIM Company prepared a BIM and SketchUp conference for end users in Guangzhou. John added that “Maybe SketchUp is BIM for everyone” in his slides, and added that “SketchUp can do more than just visual representations." digitalarch, a SketchUp user in Taiwan, had explained this notion for us at the Shanghai salon.
We look fresh today. We are standing at the entrance of Guangzhou University.
SketchUp users always have a way of expressing their thoughts; a designer who is also a professional rapper told us he would write a Chinese rap for SketchUp. What a brilliant idea! I know it's been a long trip—10 days, 3 different cities, and my American colleagues were all anxious to get back to their sweet families. Let’s end our long trip with a poem written by Chen ling 陈玲, a young Shanghai landscape designer. When he told us that he believes that SketchUp changed his life and career, I saw his eyes light up.
Chen ling is a very talented designer. Look at the scale of these models!
Poem: Gratitude for SketchUp by Chen ling 陈玲
Translation:
Have been working in designing after leaving school So lucky I met you—SketchUp in October 2004 You change my career Because of you, I seize more opportunities. Because of you, I am one of the youngest writers who can publish the book about you. You give me so much, so much wonderfulness You bring me so much, so much glory Thanks a lot
Glance at the masthead of this blog and you'll know something's up. Our new graphic identity is only the most obvious of the changes we've made in SketchUp 8 M4. It's unusual for us to do four maintenance releases between major versions, but then, it's been a bit of an unusual year, hasn't it?
Our move to Trimble gave us an opportunity (and an imperative) to finally build a proper graphic identity for SketchUp. In many ways, this was one of my favorite short-term benefits of the acquisition; it always irked me that our tool, which is so good at making pictures, had a logo that consisted of its name typed out in a particular font. Blech.
Devoted students of SketchUp history (sketchupologists?) will recall that until March of 2006, our logo looked like this:
The most distinctive element of our original logo was its big, red U.
This kind of logo is known as a logotype or wordmark, meaning that there's no symbol attached to the word; the word is the logo. The trouble with using a logotype for a piece of software is that, most of the time, individual programs on your computer are represented by application icons that live on your desktop or in a strip along the bottom of your screen. SketchUp's icons have looked like this over the years:
SketchUp's application icons have, in my opinion, gotten progressively less good over the years. The last one (on the right) only appeared on Google's More > Even more page. None of these icons were ever really used as product logos.
The Google years brought several logos as we responded to successive top-down branding directives. None were particularly inspired, and none solved the we-need-an-icon problem, either.
Mostly SketchUp, then mostly Google, then side by side.
As we kicked off our new branding effort in June, we were determined to kill two birds with one stone: We would design a symbol (some people call it a "mark") that would do double duty as our product icon.
For the mark/icon itself, we were looking for a form that communicated a number of things. Less important were notions of informality and simplicity, though we obviously didn't want our symbol to convey stodginess or head-banging complexity. We focused on the notions of three-dimensionality, dynamism (movement) and perspective.
When we saw the sketch of the shape that would eventually become our icon, we knew we were on the right track. It's derived from a cube—which is the go-to symbol of 3D for apps like ours—but it isn't really a cube at all. The implied stairs or levels are an apt representation of our roots in architecture and other construction disciplines.
If you look closely, you'll notice the chevrons formed by the top surfaces even point "Up" in a nod to our signature tool.
Whereas application icons are often very colorful—with lots of fine detail, gradients and shading—corporate marks need to be much more flexible. They need to be able to scale up and down without looking smudgy or oafish; they need to be able to printed in a single color when necessary; they need to be readable on black, white, colored and photographic backgrounds; they need to be able to be reversed into white sometimes. The best logos look good no matter where you use them.
We decided it was best to stick to a single color. But which one? SketchUp's hue has shifted slightly over the years, but it's always been a flavor of red. As we looked at ruby and garnet, crimson and cadmium, burgundy and brick, we kept coming back to a desire for SketchUp's red to be as simple and positive as the rest of our brand. Our choice, Pantone 1795, is saturated, definitely not brown or purple, and stop-sign-visible at a thousand paces. I cheer up whenever I see it.
SketchUp Red is Pantone 1795 (a.k.a #e72b2d)
We chose a typeface called Whitney for the word "SketchUp". On the Comic Sans-to-Baskerville continuum of font gravitas, Whitney is friendly, professional and clean. Just like us, we think. To uniquify things a bit, we tweaked the ascenders and descenders to match the angles in our symbol. Setting them next to each other, we have the makings of the world's greatest t-shirt:
For the rest of the SketchUp Pro family of applications, we derived icons from the SketchUp symbol. LayOut is represented by an orthographic top view of the stair-step shape. Style Builder is an outline of the mark, rendered with stylized edges. All three icons are SketchUp Red, which ties them together and sets them apart.
Did you notice the "L" in the LayOut icon?
Some of you are probably wondering why we didn’t just wait until SketchUp 9 to change this stuff. The answer is actually pretty simple. With the deadline looming on purging the old Google SketchUp logo from our product, we had three choices: lop off the first word and hobble along without a real graphic identity; come up with an interim solution; or go through the difficult but worthwhile process of solving the problem once and for all. The first option was totally unsatisfying, the second caused more issues than it solved, and the third offered us the opportunity to make a fresh start. It was an easy decision.
And because this is a full-fledged maintenance release...
...we continue to squash bugs and make SketchUp hum along as best we can. Mosey on over to the SketchUp 8 M4 Release Notes page to see a list of everything that’s better now.
3D Basecamp is the world’s premier gathering of SketchUp people. Part user conference, part pep rally, this year’s edition is set to take place in our hometown of Boulder, Colorado on October 15th, 16th and 17th.
Registration opens Tuesday, August 28th at 10:00 AM MDT (GMT -6:00)
With fewer than 150 spots available, we expect Basecamp to fill up quickly. If you're planning to join us, might I suggest setting an alarm on your phone for when registration opens. Be there or be cube! (Because a cube is a square in 3D. Har har!)
To register, and to learn all about Basecamp, please visit our event website:
If you sometimes try to orbit the spreadsheet you're working on, you're one of us. If the phrase "Follow Me that profile along this edge" makes sense to you, you're one of us. If building a model is easily the best part of your workday, you're one of us. We're people who really, really like SketchUp, and every couple of years, we get together to meet, learn and be inspired.
The fourth-ever SketchUp 3D Basecamp is scheduled for October 15, 16 and 17 of this year. It's happening in our hometown of Boulder, Colorado, and everyone's invited. We haven't ironed out all of the details yet, but we thought we'd let you know so you can mark your calendar. It's the most fun you'll have this year.
Want us to let you know when more information is available? Click the red button!
The video below is a recap of the goings-on from our last 3D Basecamp in 2010. As you can see, a great time was had by all:
When someone writes a plugin for SketchUp, he or she isn’t just looking to cram a few more icons into your toolbar. Plugins help users solve important design and workflow problems, so plugin developers have to be as keyed into the needs of SketchUp users as we are. Our Ruby API is a canvas, but it is the ingenuity of developers that makes the plugin community truly remarkable.
Today, I’m happy to announce that Íscar, the Spanish SketchUp Pro reseller and Authorized Training Center, is hosting the first-ever SketchUp Plugin Conference this fall.
The details: Íscar’s conference will take place September 5th - 7th, 2012 in Madrid, Spain. The event is focused on the needs of plugin developers, distributors and resellers, though it’s open to everyone. The conference will be a venue for developers to present their plugins, share tips with other plugin authors, and even find new distribution channels for products. Users will see demos of the latest and greatest plugins, and have a chance to compare notes with people from around Europe and the rest of the world.
This conference is not being organized by the SketchUp team but we are co-sponsoring it, and a few of us will be in attendance. We may even cook up a presentation or two.
Robert W. Lang is executive editor of Popular Woodworking Magazine, and the author of several books including “Woodworker’s Guide to SketchUp.” Bob blogs about Woodworking and SketchUp at his website ReadWatchDo.com. We asked him to tell us a little bit about his process and why he uses SketchUp Pro.
Building furniture is a rewarding process. Most of the challenge is problem solving; time in the shop is always in short supply and quality materials aren’t cheap. Good problem solving at the start allows a more efficient build and prevents costly mistakes.
The efficiency of SketchUp means I don't spend as much time designing and planning as I used to, which gives me more hours in the shop. Those shop hours are also better because I have a reliable reference that answers almost any question that might come up while I build. (Except for “where did I leave my pencil?”) I can concentrate on the physical work without being sidetracked with an hour or two of head scratching to solve a design or engineering problem
Early in my career, I fancied myself a designer and vowed to only create original designs. Then one day I read something from Gustav Stickley to the effect that if you wanted the ability to design new work, you needed to thoroughly understand everything that had been done before. Twenty-five years later, my work is mostly reproducing designs from the Arts & Crafts period of the early 20th century. This chair (below) is a Stickley piece, and despite its simple appearance there are a lot of subtleties to the overall design. These quirks are what make this furniture intriguing—the closer you look, the more you find.
When I'm planning a reproduction, I work a lot from photographs. My process is mainly the same one I used years ago with pencil and paper. Importing a photo, scaling it to actual size and measuring the photo on screen are far easier (and more accurate) than staring through a magnifying glass and using a proportional rule.
If possible, I work from photos I've taken myself; these are different than photos taken for publication. I'm looking for information, and the best source of that is a straight-on view. I'll do some things in Photoshop, sometimes correcting for lens distortion, but mostly I adjust the image to make it easier to discern details.
After I import a picture into SketchUp, I scale it so that parts I can measure with the Tape Measure tool match known dimensions. I place the images on a separate layer, so I can easily turn them off and on as I build the model. I usually build the model near the photos, but for some parts I work on top of them. To get the outline of the corbel under the arm, I traced the shape on top of the image, then extruded it to the proper thickness with Push/Pull.
I import photos into SketchUp and scale them to a known dimension. Sometimes I model next to the photo, and sometimes I trace directly over the photo.
Sometimes the photo will reveal something I'd rather not see. The next image is from early on in the process, right before I discovered that the lower rail between the front and back legs isn't parallel to the floor, as I have it in the model. That slight angle adds a lot to the appearance of the finished chair. It's the chair's way of saying “Come and have a seat!”, but it makes building the side assemblies considerably more difficult. Instead of five identical vertical slats, each one is a bit longer than its neighbor. Additionally, the shoulders of the tenons have to be cut at an angle rather than square.
With the photo available within the model for reference, I can check dimensions and details while I work. In this case I realized my first attempt missed an important but subtle detail.
Eventually, I have a model that I'm happy with; I consider this the halfway point of the process. The second half is extracting information from the model. Everything I want or need to know about every part of this chair is there on screen. Now the task is to pull out the information I need (or want to show someone else) and to put it a manageable form.
In the shop I tend to spread out until the project I'm working on covers every available horizontal surface. I follow much the same process when working in SketchUp: I make copies of the entire model (or portions of it) off in empty space somewhere to serve different functions. I create scenes for each of these views, with layers for dimensions, so I can export or print only that portion of the model. If you back up and look at everything, it's pretty chaotic.
Zoom Extents makes it look like I’ve made a horrible mess, but I generated several scenes in a short period of time, each showing important details by copying portions of the model and moving them into empty space.
That said, each scene has a lot of value; there are a number of ways scenes can be used. In my work on books of measured drawings and for Popular Woodworking Magazine, scenes are exported to Adobe Illustrator to use for two dimensional drawings (plans, sections and elevations) or three dimensional exploded views.
This is a typical Scene that I will print and take to the shop to use as a reference for each part of a complex assembly. The model contains precise information about every part, and if I forget to print a dimension I’ll fire up the laptop, open the model for a closer look and measure the parts in the model.
For a project build video, I exported an animation of several scenes and used that clip in the finished video to explain the construction process. For my own use in the shop, I print 3D views of groups of parts and stages of the process for reference. For the side assemblies of this chair, I printed exploded views as well as details such as the image of the leg joinery. In SketchUp, it doesn't take long to create these extra views. So far, when I wonder “Can I do this with the model?” the answer has been, “Yes I can, it works very well, and it doesn't take very long”.
Instead of standard cutlists, I create views such as this to accurately lay out the parts. It might take 5 minutes to drag each leg out of the Components window and add dimensions, and it saves hours in the shop. It’s surprising how close this is to having real parts to refer to.
One unexpected benefit of using SketchUp is that it turns out to also be a great tool for teaching woodworking. Unlike a valuable antique, a 3D model can be taken apart to study how it goes together. When I teach a class on building a piece for real, one of the main lessons is the sequence of doing the work. This is a crucial skill for successful building; knowing which parts to layout and cut first, how those first parts affect the following parts, and how to group parts together in sub-assemblies to make the final assembly simple. With a good model, an inexperienced builder can work all of that out before getting to the shop, learn the lesson in less time and not risk wasting valuable materials or shop time. The boost in confidence from this makes a significant difference in both the quality of the time spent building and in the quality of the finished product.
Reproducing a Stickley Morris chair is a lot of work, but there is a built in reward when the job is done.
Over the last 30 years, I’ve invested a considerable amount of money in tools to do my job. A large portion of that has been spent on computer hardware and software. Looking back, the best investment has been the money I spent on SketchUp Pro. I started using SketchUp thinking it might be an effective drafting tool, but it's turned out to be much more than that. This simple-to-use software program is the best thing I’ve found for all phases of design, engineering, planning and communicating.
There’s been quite a bit going on around SketchUp HQ lately, what with the Trimble thing and the launch of our exciting new SketchUp Showcase and all. But Tyler and the rest of the Engineering gang haven’t just been sitting on their hands, either. Today, they’ve got a fresh new SketchUp maintenance build for you as well. Nothing major, but there’s some good stuff in it.
As usual, you can read all the details here, but for those who just care about the highlights:
We’ve fixed some more crashes folks reported in Ruby Observers.
Those of you with many Ruby extensions installed should no longer suffer from greyed-out menu items.
SketchUp Pro network licenses on Windows now allow multiple instances to run on the same machine at one time.
...and the usual collection of performance improvements, security updates and bug fixes.
SketchUp will notify you the next time it checks for an update, but if you just can’t wait, download a fresh install right now.
It’s our sincere pleasure to unveil The SketchUp Showcase, a home for the most impressive, interesting, and inspiring project stories that have been shared with us.
Why a new showcase? Often, when you find an amazing model in the 3D Warehouse, it doesn't tell the full story behind a project. You can download it and see how it was built. But you probably wouldn’t get a sense of why it was built. Where did the inspiration come from? What were the design challenges the modeler faced? What happened after the model was finished? The story just isn’t complete.
The Showcase is a space where the stories, images, renders, animations, and 3D models of passionate SketchUppers can shine a bit brighter.
What was the inspiration behind this 3D model? | Image courtesy of Roberto Bergamo
But that's not all – the Showcase is also a first look at a new element of SketchUp technology: an online 3D model viewer. This 3D viewer lets you orbit, zoom, and pan 3D models right in your browser! To see it in action, find a project marked with a red flag or simply click here. Please note: you’ll need to use the latest version of Google Chrome to take advantage of the WebGL goodness that makes this viewer possible.
Go ahead and start exploring now; content is organized by category filters, so you can easily find projects based on your interests.
A project page featuring the new online 3D viewer | The Catalyst Playground in Vietnam
Finally, our team would like to dedicate the SketchUp Showcase to all the passionate SketchUppers who’ve supported us for over a decade. As we enter a new chapter with Trimble, we hope the Showcase and the online viewer are proof that SketchUp is only getting better. It’s clichéd to say we wouldn’t be much of anywhere without you, but that doesn’t make it any less true. Thank you for all of the love (sometimes tough) you’ve sent our way. Your passion for SketchUp is still what gets us out of bed in the morning.
Over the past several months, hundreds of teams from all over the world have submitted stunning geo-models for our Google Model Your Town Competition. These examples of pure 3D civic pride are breathtaking to behold. Difficult as it was, the SketchUp team managed to pick six finalists, after which we asked the general public to vote for their favorite collection of models. Tens of thousands of you weighed in, and the talented team from the north of Spain were victorious. Zorionak! (That’s “Congratulations!” in Basque.)
Want to see how they won? Take a look at Team Getaria’s collection in the 3D Warehouse, pop over to our winners’ page, and watch this video to see their astounding work:
The winning team is a dynamic duo: Josetxo Perez Fernandez, 36, is a professional who works in computer administration; and Pedro Domecq Aguirre, 45, is a programmer, 3D data specialist and network administrator. Those are their day jobs, anyway. It turns out that they’re actually world-class, polygon-wrangling, texture-mapping, megabyte-optimizing, geo-modeling superheroes. And now they’re bona fide local heroes, too. Thanks to them, millions of people across the globe can now get familiar with the beautiful little town of Getaria.
The beautiful coastline of Getaria
Not only that, but we’ll also be awarding US$25,000 to a local school and hosting a celebration with the town of Geteria in honor of Pedro's and Josetxo's accomplishment.
Getaria Lighthouse on Mount San Antón
Zorionak to the winning town, to the other five finalists, and to all the other entrants who collectively modeled almost 25,000 local landmarks that are now available for all to enjoy in Google Earth’s 3D Buildings layer. The virtual world is a richer place thanks to your efforts, and the real one is a lot better off, too.
Last April, our friends (and partners) at Igloo Studios released Product Connect for Google SketchUp to help designers document the product choices made in their SketchUp models. Today, I’m happy to report a new version of Product Connect is now available for download from the Igloo Studios website. This version makes it even easier to design with real products.
This video provides a nice overview of the new release:
The new version of Product Connect features thousands of product models and these three plugin-based tools:
Get Products
Use Get Products to browse nearly 300 collections of branded and generic products
Get Products is a new tool that makes it dead simple to add pre-existing product models from the Google 3D Warehouse. Like the Get Models tool in SketchUp currently, Get Products launches the Google 3D Warehouse but directs you to a collection with nearly 300 sub-collections of branded and generic product models. You can choose products from a Product Connect enabled catalog and you'll find that product information has already been added for you. Or, choose other Building Product models and add the information yourself.
Product Editor
Product Editor being used to specify a Delta faucet
With the new Product Editor tool, you can now create your own Product Connect enabled models. Just take any SketchUp component (including materials), launch Product Editor, and add any information you need such as product type, name and description. Product Editor can also be used to add or edit info in pre-existing Product Connect enabled models such as project specific notes or price.
Report Maker
Report Maker created product schedule, pasted into a LayOut presentation
When you’ve finished your design, and filled it with Product Connect enabled components, the new and improved Report Maker tool allows you to save organized product schedules in .csv format. With just a few clicks, product lists can be included in construction document sets, edited to create pricing estimates, and even used to place and manage orders.
If you have an existing collection of SketchUp components that you’d like to enable for Product Connect, Igloo Studios offers a service for upgrading existing components. Or if you don’t already have product models created, Igloo Studios can help you with that too. Contact them for more information
Thanks again to Igloo Studios for another great launch that will help SketchUp users everywhere streamline the product selection and specification process.
SpaceClaim is a solid modeling application with a goal similar to SketchUp: make a 3D mechanical design tool so easy that anyone can use it. We helped the SpaceClaim team read and write SKP files years ago, but their latest release is a big step forward for engineers who are looking to use SketchUp in their workflow.
With SpaceClaim, engineers can convert conceptual designs in SketchUp’s native SKP format (which is optimized for fast performance) into precise solid models needed for mechanical design and manufacturing. As an example, SketchUp models usually convert to CAD programs as meshes, so holes end up being made of lots of little faces. SpaceClaim uses its feature recognition technology to convert these features into exact cylindrical surfaces.
Take the model below: SpaceClaim’s SketchUp import tools automatically convert facets to precise geometry when possible. On the left is the original SketchUp geometry. The middle model demonstrates the new import capability, with no manual cleanup. And the model on the right is further improved using SpaceClaim’s manual repair capabilities.
Moving from concept to production model with SpaceClaim for SketchUp
With this functionality, mechanical designers can directly re-use SKP files, rather than remodeling from scratch. This type of precision is important for rapid prototyping, laser cutting, CNC machining, detailed dimensioning, simulation, and photo-realistic rendering. And SpaceClaim’s process produces models that are completely compatible with other mechanical CAD systems. Another bonus: these import tools enable mechanical engineers to use the entire 3D Warehouse as a starting point for their designs.
If you'd like to try SpaceClaim, please visit their website.
We recently came across some marvelous work from Alexander James International (AJI), an interior design firm in the UK that specializes in the Hotel & Leisure market. Michael Reekie, Senior Interior Designer for AJI, was good enough to provide some insight into how they use SketchUp Pro.
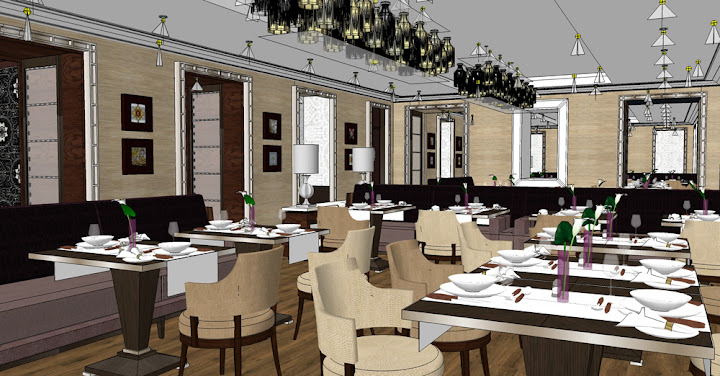
I started using SketchUp Pro about five years ago. At that time we considered it a tool to help produce quick 3D line drawings of small areas. Gradually, its value has become more apparent and with the recent addition of Shaderlight, it is now considered to be an invaluable tool by the whole design team.
At the earliest stages of the design concept, I import a CAD plan of the project into SketchUp from which I build a model. It gives us a three dimensional awareness and makes space planning both easier and more accurate.
The SketchUp model offers better awareness of space which aids in the design and in space planning.
I continue to use SketchUp Pro throughout the design process, periodically using a fast, low resolution Shaderlight render to check the progress of lighting levels, features, furniture, and finishes.
SketchUp model with entourage and Shaderlight lighting elements, when rendered, will help validate the design, look and feel.
When I am sure that no other changes are necessary I produce a high resolution rendering which is imported into Photoshop. I can then make any small changes to colours or light levels and add people or anything else that I feel would enhance the final visual.
Final Render: SketchUp Pro + Shaderlight + Photoshop
Before using SketchUp I produced hand-rendered visuals. The uncomplicated nature of the program has made the transition easy and very effective. SketchUp has become an invaluable tool for the whole design team.
A big thanks to Michael Reekie (michael@aji.co.uk) and the whole AJI team for providing this snapshot into their SketchUp workflow. Great work!
CyArk is a non-profit organization dedicated to digitally preserving cultural heritage sites. They do this by collecting, archiving, and providing open access to data created by laser scanning, digital modeling, and other state-of-the-art technologies. CyArk is also one of the many recipients of SketchUp Pro licenses as part of our SketchUp for Nonprofits program. This case study came to us from Justin Barton, a Technical Services Manager at CyArk.
A perspective view of 3D laser scan data (terrestrial LiDAR imagery) of Mission San Francisco de la Espada, San Antonio, Texas.
As part of the ongoing effort to educate the general public and disseminate information in an interactive environment, CyArk uses millimetrically precise data from heritage sites captured with 3D laser scanners to model the sites in SketchUp Pro. In order to do this, we use two methods:
Method 1: Orthorectified imagery
Our 3D laser scan processing software allows us to export orthorectified images of the data. We begin by exporting a plan of the structure to build a basic block model from. The plan is brought into SketchUp Pro, scaled, geo-located (all of our scan data is geo-located with GPS), and then the model is created from the accurate plan data.
Using orthorectified imagery created from laser scan data to trace out the model in SketchUp Pro.
After we create the block model, we import orthorectified elevation views of the structure. We then trace the outline of the building and “push out” the unwanted parts to create the unique architectural shape. The elevation view is also used to overlay the photo-real texture information.
Method 2: Direct modeling from 3D scan data
We are also able to use the Pointools plugin for SketchUp that allows us to load the 3D laser scan data point cloud directly into SketchUp. This allows even more precise modeling directly over the data. Again, orthorectified images of facades are used to overlay texture information.
A 3D laser scan data point cloud, brought into SketchUp Pro using the Pointools plugin. (Note: This image has been altered to improve visualization of the process.)
After modeling is complete, visitors to the CyArk website and projects interact with them in two ways: CyArk has an online, Java-based web app that allows users to view 3D point clouds directly, or view solid models such as those created in SketchUp Pro or other 3D meshing software.
3D model of Mission San Juan Capistrano, San Antonio, Texas created in SketchUp and viewed in CyArk’s free online 3D Viewer.
The other way that users can interact with 3D models on CyArk’s website is by using the Google Earth plugin, which we’ve integrated into a web page on the site. This provides a navigable 3D environment in which users can see geo-located SketchUp models while interacting and viewing geo-located multimedia items such as architectural CAD drawings, videos, 360-degree panoramic images, photographs, historic imagery and more.
A 3D model of Mission San Jose y San Miguel de Aguayo, San Antonio, Texas created in SketchUp and viewed in Google Earth on the CyArk website. Multimedia items (architectural drawings, videos, panos, historic images, etc.) are geolocated on the Google Earth interface and represented as a variety of type-specific icons that surround the model.
In addition to modeling directly from accurate 3D survey information (as seen here in the San Antonio Missions project and associated iOS mobile app), CyArk and our partners have taken advantage of SketchUp Pro’s easy modeling platform to create historic reconstructions of sites and site features that no longer exist. For example, for a project with Fort Laramie National Historic Site, eight historic reconstructions were created in SketchUp. Users visiting the Google Earth map of the project can choose to see the Fort as it appeared in seven different time phases, as well as a detailed reconstruction of the Post Hospital. All were created from extensive research, historic photographs/sketches, consultation with park experts, and metrically accurate laser scan data of structures, standing ruins, and remaining foundations as the base for the models.
SketchUp Pro provides CyArk the tools to quickly and accurately model historic sites to create interactive 3D environments for members of the public, educators, students and researchers to access online. This aids us in fulfilling a significant part of our mission to share, disseminate and educate.
Thanks for sharing this story, Justin. If you’re interested in getting involved with CyArk, you can find out more about volunteering, becoming a partner or donating to CyArk on the Get Involved web page.
GreenspaceLive is a software and consultancy shop based on the Isle of Lewis in Scotland. The company was founded in 2008 as a spin-out from the Greenspace Research, a low-carbon building and renewable energy research program at Lews Castle College, University of the Highlands and Islands. This case study about gModeller, the company’s SketchUp energy analysis plugin based on gbXML, comes to us from Donald Macaskill, Technical Manager and Energy Engineer at GreenspaceLive.
Making hospitals more energy efficient
Hospitals have unique energy consumption demands. Not only do a hospitals require lighting and heating 24 hours a day, but they also require ventilation, sterilization, laundry, food preparation and important medical equipment to be powered as well. Therefore, any improvements made to the building could drastically reduce the bills, freeing up money to be spent elsewhere.
The NHS Western Isles Trust are very proactive in trying to reduce their energy costs and carbon footprint. To determine their baseline energy consumption and carbon emissions and then to simulate a number of fabric and technology improvements to their largest building, they turned to GreenspaceLive. A hospital model and energy analysis workflow was created in Google SketchUp Pro with GreenspaceLive’s gTools suite.
Completed model for gModeller
Project Methodology
To start, existing 2D CAD models and scanned paper drawings were shared via gWorkspace. These floor plans were then imported into Google SketchUp Pro. Once the floor plans had been imported, each floor was extruded to the correct height and dimensions. A detailed model is not required for the gModeller plugin, so the model could be simplified to single faces for walls, floors and roofs.
Once completed, attributes were added to the model using the gModeller's customised materials, located within the Paint Bucket tool in SketchUp. Next, spaces were identified using the manual Space tool, which allowed the model to have zone specific information, such as heating, lighting and ventilation for different areas.
The completed gbXmL model
The gbXML building information model generated by gModeller was now ready to be exported to an energy analysis engine. In this case, gEnergy was used, however, exported models can also be imported into Green Building Studio, Ecotect, Trace, DesignBuilder and others. gEnergy was initially run using the Hospital’s existing fabric and technologies to establish a baseline Energy Performance rating, subsequent analysis runs were then carried out with simulated improvements to the building, including proposed refurbishment changes, to determine the impact they would have on performance of the building.
Once gEnergy runs were completed, the model was exported to Google Earth and presented to the clients, showing gDashboard energy results on screen while touring their model.
The model in Google Earth with energy data
Using the gWorkspace cloud platform, the modeling team was able to share and collaborate with the client throughout the process. Team members and client representatives were able to view, download and share files from the project, as well as view all energy runs that were undertaken.
The Results
Armed with the tools and the data, NHS Western Isles Hospital were able to model different scenarios and view the impact these changes would have. The results were dramatic – making a number of changes to the heating system, the team was able to demonstrate that the most effective change would result in over 50% energy savings, while reducing the CO2 emissions by almost 80%.
Dave Tierney, part of the Energy Team at NHS Western Isles Hospital said, “Using gTools, senior executives and staff received an overview of our carbon emissions, energy consumption and the impact changes in technology and fabric will have on our building. We can clearly see the differences in low carbon technology investment options. The results will help shape our plans for tackling carbon emissions and energy consumption in the future."
To learn more about gModeller and the rest of the gTools suite, you can visit the GreenspaceLive website. You can also sign-up for a free trial. Thanks again to Donald and the rest of the gang at GreenspaceLive for sharing this case study with us.
Allied Works is an interdisciplinary architecture and design practice that operates from offices in New York City and Portland, Oregon. Founded by Brad Cloepfil in 1994, the practice has been defined by a deep concern for the landscape, human experience, and craft, as well as the preservation and enhancement of the public realm.The firm drew widespread acclaim for its groundbreaking design for Wieden+Kennedy's world headquarters in Portland's Pearl District in 2000. The firm continues to draw in big-name clients, having most recently completed a new feature animation facility for one of the country's leading moviemakers and the much-anticipated Clyfford Still Museum in Denver, Colorado. We spoke at length with Brent Linden, the Director of Allied Works’ NYC office, about the firm’s work, its creative process, and its use of SketchUp Pro.
concrete and light in three dimensions; construction photo
intersection of earth and sky; physical model, charcoal and resin
What kind of projects does Allied Works take on?
Allied Works can design anything, but in our history, we’ve mostly focused on museums, gallery spaces, creative work spaces, and creative educational spaces. We seek those out, but we’re also actively pursuing a lot of different programs as well.
My impression of Allied Works' design workflow has always gone something like this: Brad Cloepfil (the firm's Founding Principal) sits down with an enormous pad of paper and a lump of charcoal. He proceeds to make huge, gestural drawings that are equal parts light study, parti diagram and abstract rendering. A few years later, the building opens. What happens in between?
Let’s talk about the Clyfford Still Museum, given that it’s at the end of its cycle in terms of design and construction. It was a competition. Brad did have a stroke of insight, much like you were saying. Charcoal and pastel are his main generative tools. The project is really about the earth and about the light, so charcoal happened to be perfect. When he came into the office, he had a sketch which was about the intersection of those two things.
darkness, light, earth and sky; concept sketch, charcoal and pastel on paper
Then we have our design team, which sometimes includes people from outside of our office—collaborators like structural engineers and landscape architects. We spend time figuring out what all the parameters are, all the forces that are involved: cultural, civic, economic, experiential (which is huge) and structural. And then the form is derived from the mixture of all of these design elements. We do heavy investigations with material models; we do a lot of concept models to try to tease out the main essence.
Are those physical models or digital models?
In this case, they were physical models. We were trying to understand, through material manipulation and assembly, more about the experience and the form and the message of the project. "Message" is really the only word I can come up with. How is it “of the place"? How does the material itself communicate something about the experience?
spatial and structural orders; model study
Our design work strives towards a unity of space and form—the form itself trying to be a single body that’s understandable as a single body. With the Clyfford Still Museum, this was especially true. It’s kind of an unfolded plane that’s folding back on itself. It’s solid from the outside, but the space writhes and weaves together on the inside. It’s like a nine-square cube; some planes are subtracted, and some planes are moved around, with the goal of making a space that feels continuous.
The way we work on this kind of project is with physical models, which you can see in front of you and turn around, or to work in a digital 3D space that you can work on quickly. The Clyfford Still Museum was the first project where we explored the interior of the building through a digital 3D model study. We primarily used SketchUp Pro, probably because it's so FAST. And everyone participated—from the people who were actually modeling (I was one of those people), to Brad himself looking at the screen and saying Why don’t we just move this here? Let’s look at it from this other position. Let’s move this wall here, etc.
spatial figures; section sketch, charcoal on paper
spatial figures; 3D model sections, SketchUp
He learned how to navigate the 3D space, and by the end of the project, a lot of our design meetings were just moving through 3D models to make sure that the understanding of the space that we were going for was being supported by all the different orders that were happening in the building: the structural concrete wall order, the order of moveable art partitions, and others. We made sure that we could see through the building the way we wanted to, that everything was supporting the experience we were after.
Would you say that you typically design from the inside out, or is there an idea for an exterior form?
It’s a dialog between the two, but I think the idea for the structure, the idea for the landscape, and the idea for the experience all happen at the same time. In a lot of projects, that ends up feeling like it’s from the inside out. We’re less concerned about the facades than we are about the experience of moving through the building.
space, tangent, and corner study; paper models, SketchUp
3D investigation, representation, and result; SketchUp (top), Maxwell Render (center), and photograph (photo credit: Jeremy Bitterman)
Can you talk a little more about SketchUp's role in Allied Works’ design process?
SketchUp is a tool that we use for design studies and for visualization purposes; also, for making models that end up becoming renderings, or even drawings. We export vector lines and make them into plans or elevations or sections. Sometimes we use it for making diagrams—actually, it’s pretty useful for making diagrams, especially in concept phases or competitions, where you need either a 3D axonometric, or a section cut perspective. I know we used SketchUp to make the model for the animation for the National Music Centre project, and for some extensive renderings that were done for marketing purposes.
National Music Centre, early design study; SketchUp
You talk a lot about things like light and materials and the way spaces make people feel—I think I’ve even heard the word “phenomenology” used to refer to how your firm thinks about architecture. Is there anything about SketchUp in particular that makes it useful to you, given the way Allied Works operates?
We’d want any tool we use to help us realize our vision for what the space is going to be like, in terms of its experience. I’d say that materials are key, light is key and the order of the space is key. Of those three, the last one is where SketchUp helps us work. Iterative physical models just seem to take too long to build now that we have a tool that’s much faster.
Another way to think about spatial orders is to think about sculpting space. If you’re sitting inside a network of physical planes that end up making a space, and you can see from where you are to some kernel of space that’s three floors up—and you’re seeing it through an atrium, or a matrix of walls, or something—it can only be done by building a physical model or by using 3D software.
interior spatial study; pencil on paper and 3D section model, SketchUp
The reason we use SketchUp is because we can do so many iterations so quickly. Our design process is very iteration-heavy. On the CSM, we iterated through the configuration of the walls and floor planes and roof plane to make it feel, at the same time, like a complex spatial organism and a single body. Getting those two things to come together is quite difficult. We probably made a thousand models of basically the same thing.
Are you serious? A thousand?
Yeah, but not full-fledged models—study models. We also use the Scenes feature to orchestrate animations of moving through the space. Because it’s not actually about single points of perspective; it’s about the experience of actually moving through the space — people don’t just stand still. I’ll click from scene to scene and we’ll review how the space unfolds as you’re moving through it. It’s like having a small physical model and turning it around in your hands, but with SketchUp, you actually get to be inside the thing.
iterative structural and spatial order study; SketchUp
What other design tools do you use? How does SketchUp Pro interact with the rest of your toolkit, and how does that interaction support your design process?
Extensive hand drawing, hand sketching, just to get details out. A lot of photo collage, primarily in Photoshop. A lot of concept modeling, which is different from spatial modeling. Our concept models are not white foamcore models; they’re the kind of models that you can only make in a wood shop, or through metal casting, concrete casting, or glass casting. We had a guy make a model where he hammered spikes of glass into this huge chunk of wood. He actually figured out how to do it without breaking the glass, which was ridiculous. Those are the tools we use at the beginning of our process.
concept model study; wood and glass
carving landscape and earth; concept model, wood
Then we use Vectorworks, our drafting software, and Illustrator, and Photoshop, and SketchUp Pro to do diagramming and planning work in our programming and planning phases. When we get into schematic design, it’s basically the same toolset, and even on into design development. We end up doing generative design all the way through the end of CDs.
In some cases, we build concept models even for details. We use SketchUp Pro and Maxwell to visualize how details will look in the space, and how lighting will work. We work extensively—especially on our museum projects—with lighting designers. We’ve worked a lot with Arup Lighting Design. In the past, we’ve built 1 inch = 1 foot physical models that Arup would use for lighting analysis. These days, we’re more likely to build 3D models in SketchUp Pro to give them. They give us back rainbow-colored model renderings that tells us where the light is going to be hot and where it’s not.
What’s your workflow from SketchUp to Vectorworks look like?
Depending on the project, we export vector graphics from SketchUp Pro and import them into VW to use as a baseline for the drawings. With the CSM, we had a model that was 100% accurate to the drawings. People on the team ended up using the model to design the details before they did the drawings.
So your SketchUp model reflects what was actually built?
Almost. I think that during the construction administration phase, they didn’t keep it up—as always, there were some slight modifications made during construction. We used the 100% CD model for coordination with the mechanical engineers. I don’t know if they used SketchUp themselves or converted the model into something else, but I know it was very helpful for them. Like in a lot of our projects, the mechanical space is really tight, so coordination was tough. Having a 3D model was key.
Is there a feature specific to the Pro version of SketchUp that you find particularly valuable?
Going through the list of Pro features, it’s obvious to me that we couldn’t make do with just the free version—primarily for the communication between different software packages. We’re always moving back and forth between SketchUp Pro and Vectorworks using DXFs or DWGs; going back and forth between SketchUp Pro and Rhino using 3DS, and sending MXS files to Maxwell Render Suite.
We also love the Solid modeling in SketchUp Pro 8. We’re doing a lot of furniture work now, and we use SketchUp Pro to do that modeling. For the current version of the furniture we’re working on, it has a lot to do with the idea of carving out of a solid body. So we model the solid body, we model the shape of the “carve”, and we subtract one from the other. Before the Solid tools in SketchUp Pro 8, we would have had to make both of those forms, intersect the two to generate the necessary edges, and delete the extraneous faces. Now I don’t have to do all that. Solid tools are definitely a big thumbs-up for me.
Clyfford Still Museum furniture studies; SketchUp, Maxwell Render
If we told you tomorrow that you couldn’t use SketchUp, what would happen to your design process? How would you work?
I guess someone would just have to get a lot faster on some other kind of software. None of the other programs we use are as fast; we’d be taking a step backward in terms of the speed at which we can produce design iterations and models for visualizations. It would be tough. Please don’t do that.
 John really enjoys drawing on the wall.