Showing posts with label Tips and Tricks. Show all posts

Wednesday, October 3, 2012

Creating a plan of your SketchUp model in LayOut

Earlier this year, we shared a snapshot of how architect Nick Sonder uses SketchUp Pro and LayOut to work up construction documents. In comments on this blog and our YouTube channel, we noticed that folks wanted to learn more about the ins and outs of this process, so we tapped Paul Lee, author of “Construction Documents using SketchUp Pro & LayOut to walk through the basic process for porting SketchUp scenes to plan views in LayOut:

Creating a plan in LayOut is a snap. In this tutorial we will take a pre-formed model, apply a Section Cut and create a Plan Scene for display in LayOut. Below is a view of a house construction model you can download from here. Once you've opened this model (or one of your own), select the Section Plane tool from the Tools menu. Use this tool to align the desired sectioned view of the model. (Remember: Hold down the shift key to maintain alignment while positioning your section cut.)
With your model queued up, you're ready to slice and dice with the Section Plane tool
Sectioning a SketchUp model

Under the Camera Menu, Set the view to Parallel Projection; notice that you've now provided straight-on view for your plan. Next, under Window, select the Scenes console. (Tip: you can hide the Section Plane itself in your LayOut document by opening the Styles window in SketchUp, and editing the default style of your scene to hide the section plane).

Now click on the “+” button and create a scene called “PLAN”. Open LayOut and access your SketchUp model by selecting File > Insert. From here, simply right-click on the SketchUp window and select Scenes: “PLAN”. Then right-click and go to Scale = 1mm:50mm. Your scaled plan is now finished in LayOut, and you're all set to start dimensioning and annotating the important details.

Setting up your plan as a scene in prep for LayOut

Voila: a SketchUp scene imported to LayOut

Posted by Paul Lee, Viewsion Virtual Environments, SketchUp ATC

This tutorial is based on techniques found in Paul's new book “Construction Documents using SketchUp Pro & LayOut” available here from SketchUcation and also on the Viewsion Authorized Training Center website.

Tuesday, August 7, 2012

Save the date for 3D Basecamp 2012

If you sometimes try to orbit the spreadsheet you're working on, you're one of us. If the phrase "Follow Me that profile along this edge" makes sense to you, you're one of us. If building a model is easily the best part of your workday, you're one of us. We're people who really, really like SketchUp, and every couple of years, we get together to meet, learn and be inspired.

The fourth-ever SketchUp 3D Basecamp is scheduled for October 15, 16 and 17 of this year. It's happening in our hometown of Boulder, Colorado, and everyone's invited. We haven't ironed out all of the details yet, but we thought we'd let you know so you can mark your calendar. It's the most fun you'll have this year.

Want us to let you know when more information is available? Click the red button!

The video below is a recap of the goings-on from our last 3D Basecamp in 2010. As you can see, a great time was had by all:


Friday, March 23, 2012

'Save a Copy As' is my new favorite command

Every time I talk to Mitchel Stangl, I learn something new. Mitchel’s a mechanical engineer who uses SketchUp Pro to build massively intricate models of processing and manufacturing facilities. On his last visit to SketchUp HQ, Mitchel helped me improve my workflow by telling me about the File > Save A Copy As… command (which we apparently added at his suggestion).

When I’m working on a big model in SketchUp, I like to save a new copy of my file every few hours. Doing so lets me easily go back to a previous version in case I’ve accidentally deleted something I need — this happens more often than I care to admit. It also provides a measure of protection against file corruption, which isn’t common, but can be devastating.

For the last eight years, I’ve been choosing File > Save As… and creating a numbered copy in the folder that contains my project. The result is a long, long list of sequentially numbered files. The most recent is the one with the highest number appended to the end, as you can see in the screenshot below. Simple, no?

Using File > Save As... to create a sequential archive of files is straightforward, but there's a more efficient way to work.

There are two problems with this system (as I’ve come to find out the hard way): First, when I come back to a project after a hiatus, I’m never 100% sure that I’m working on the latest version of my file. Maybe I saved a newer version somewhere else? Second, when I’m working on a set of drawings in LayOut, the linked SketchUp file always needs to be the most recent one. Every time I change the name of the SketchUp file (three or four times a day), I need to manually re-link the new model to my LayOut file. Yech.


If you periodically "Save As" your SketchUp model with a new version number, the workflow with LayOut is awkward. You'll spend a lot of time relinking your current model to your LayOut file.

Using the Save A Copy As… command (instead of Save As…) takes care of both these issues. It lets you save a version of your model as a new file without renaming the one you’re working on. The saved versions can be numbered and archived, but the “master” version is always called the same thing. There’s no confusion about which is the latest, and working with LayOut is twenty times easier. Presto.

Choosing Save A Copy As... allows you to save "snapshots" of your model while continuing to work on the same file. I like to keep an archive of old versions in a separate folder, just to keep things tidy.

I love it when answers to complicated problems are so simple. Thanks Mitchel!

Wednesday, February 29, 2012

A solution for low resolution

Have you ever brought an image texture into SketchUp and notice that the resolution isn’t as crisp as it is in your image viewer?

Notice that the image in SketchUp (Right) is not as crisp as the original image (Left)

No, you’re not seeing things. By default, SketchUp downgrades higher resolution image textures to a maximum of 1024 x 1024 pixels because in the past graphics cards didn’t have the horsepower to render models with large textures on screen reliably.

If you want to turn off this feature, you can do so by going to Properties > OpenGL, and checking the “Use maximum texture size”. With this checked, SketchUp will no longer downgrade your image textures to 1024px. SketchUp will communicate with your video card and if everything is up to snuff, your image will display at a new maximum resolution of up to 4096 x 4096 pixels.

With the “Use maximum texture size” selected, the image in SketchUp (Right) displays at a much higher resolution

Important note! Your first inclination might be to activate the “Use maximum texture size” option and bring in the highest resolution textures possible.

But as anyone well-versed in the “science” of modeling with textures will tell you, the size of images DO matter. Large textures can bloat the size of your SketchUp model and tax your video card and system memory exponentially. If you are going to use the “maximum texture” option, you will need to be extra conscious about the size of your image textures and choose which ones need to be at a higher resolution.

Posted by Chris Dizon, SketchUp Guru

Thursday, January 26, 2012

Organic modeling made simple with Curviloft

The process of extruding one 2D profile such that it ends in another, different 2D profile is often called lofting. There’s no easy way to do this in plain ol' SketchUp, but there are plenty of plugins that make it possible. The one I’ve been obsessed with lately is called Curviloft; it's by the venerable Fredo6. If you need to learn about plugins in general, including how to install them, visit the plugins page on our website.

Curviloft lets you do three basic operations; which one you use depends on what you’re trying to accomplish. For the sake of brevity (and simplicity), I’m going to focus on only the first operation in this post: Loft By Spline.

The Basics

Let’s say you have two profiles that you want to connect together. The example below is super-simple: It’s a circle directly above a square. Here, I want to connect the two with a shape that goes directly between them. Curviloft’s Loft By Spline tool was made for just this kind of thing.

I start with two flat profiles (shapes) positioned one above the other.

Fredo6's Curviloft plugin includes three handy tools. This post deals with the first one: Loft by Spline. To use it, you need two or more profiles. These can be closed shapes (as above) or simple, unconnected edges (see the end of this post for an example).

With nothing selected, I activate Loft By Spline and click once on each shape. Because there are only two, it doesn’t matter which shape I click first. If there were more than two, I’d click in the order that I want to connect them, starting at either end. When both profiles are numbered, I click the green checkmark in the Curviloft toolbar (see below). This brings me into Preview mode, where I can see what I’m about to end up with.

Activate the tool, then click on the profiles you'd like to use as the endpoints for the shape you're trying to create. When you're done, click the green checkmark to enter Preview mode.

The Curviloft toolbar is complicated; there’s no getting around it. The good news is that you don’t have to understand what all the controls do in order to use the tool. In Preview mode, you can just click things to see what happens. There's no shame in experimentation.

The Curviloft toolbar is a doozy, but you can (and should) click buttons to see what happens. Every case is different, and some settings look better than others.

When you perform a Loft by Spline operation with Curviloft, the tool is generating two different kinds of geometry which it later combines. Intermediate profiles (left) are "in-between" 2D shapes spaced between the profiles you start out with. Splines (right) are lines that connect adjacent profiles together. They can be straight or curvy, depending on the settings you choose.

I like to fiddle with the Spline Method settings first (see below). This is where you control the shape of the vertical lines (splines) that connect the two profiles—in this case, the circle and the square. The three options that I find give the most interesting results are “Junction by connected lines”, “Bezier curves – Respect tangency (Method 2)” and “Junction by Orthogonal Bezier Curves”. By all means, try the other buttons, too; there’s gold in them thar hills.

Different settings usually produce fairly different results. Click around until you like what you see.

Playing with the Vertex Matching controls also yields some useful options (see below). Here, you’re telling Curviloft how to decide which points on the perimeter of each profile should connect to one another. In this case, the circle has 24 endpoints and the circle only has four. The tool does its best to figure out the intermediate geometry, but the Vertex Matching settings let you provide guidance. For me, the most interesting button is the one on the far right; often, deselecting “Orientate contours to their best-fit box” seems to produce better results. Click it a few times to see what happens.

To be honest, I really don't understand what these buttons do. I have eyes, though, and I can tell what looks good and what doesn't. I bet you can, too.

When you’re satisfied, hit Enter on your keyboard (or click the green checkmark on the toolbar) to finish generating the result.

I'm delighted every time I do one of these operations. Modeling this "by hand" would take so long that I doubt I'd even bother attempting it.

Cool variation #1: Twisting


While you’re still in Preview mode, clicking on black part of your preview object opens yet another set of controls. The Properties of the Edited Junction window shows you more information about the connections in the operation you’re doing. My favorite widgets here have to do with twisting; they let you rotate either of your profiles (in this case, the circle and the square) by 15 or 90 degree increments. The result is an insanely cool twisting effect. Click the little right and left arrows and you’ll see what I mean. Addictive, no?

Twisting 3D forms is one of those things that SketchUp modelers have resigned themselves to never being able to do. When I discovered this functionality in Curviloft, I got up and danced around.

Cool variation #2: Offset profiles

Loft by Spline works great on profiles that aren’t lined up perfectly, too. Below, I’ve moved and rotated the circle.

Your profiles don't have to be directly on top of one another to use Loft by Spline.

Again, trying different Spline Method settings produces pretty wildly different results.

Using straight splines connects the profiles in a very direct manner. Choosing a curvy spline method produces a much jauntier shape.

I dare you not to waste an afternoon playing with Curviloft. The other two tools in the set let you loft along a path and "skin" connected profile edges, but Loft by Spline is pretty powerful on its own. Remember that Curviloft is donationware, meaning that if you like it, you can contribute to its author; you'll find an option to do so in the Curviloft menu after you install it.

Here are some quick examples of shapes I whipped up while I was working on this post:

Both profiles are identical, but I used the twist options to spiff things up a little.

Lofting between a complex profile and a simple one can be tricky, but the smooth transition that ensues is always lovely. Rocket? Tree trunk? Bicycle handlebar grip?

Your profiles needn't be fully-enclosed faces. Try lofting between arcs and other edges to produce all kinds of things that would be painful to model without Curviloft.

I used Curviloft to model parts of this queen I'm making. Some of us on the SketchUp team are collaborating on a 3D printed chess set.

I've written about a couple of Fredo6's other terrific plugins in the past. RoundCorner gives you the ability to quickly and easily create rounds and fillets on almost any shape. FredoScale is a toolkit for stretching, bending, twisting and otherwise deforming your models in incredibly useful ways.

Tuesday, January 17, 2012

New Book: SketchUp for Game Design

I’ve yet to meet a SketchUp modeler who doesn’t—at least just a little bit—want to work in the video game design industry. I get a stupid grin on my face when I think about how much fun it it would be to make battle tanks and exploding oil drums and secret doors for hidden basements full of zombies. In the gaming world, boring things like gravity and cost take a backseat to novelty and sheer coolness.

But how to turn your SketchUp habit (and job cranking out toilet stall details) into days full of armor design and wandering through bad neighborhoods looking for interesting photo-textures to shoot?


Google SketchUp for Game Design is Robin de Jongh’s newest book; he also wrote SketchUp 7.1 for Architectural Visualization. It presumes that you’re a SketchUp beginner, but then quickly gets on to the good stuff:

  • Finding good resources for photo-textures
  • Using Meshlab to convert your models in useable 3D game assets
  • Working with the Unity 3D game engine (which is widespread, free-or-low-cost middleware for designing game levels)
  • Creating high-quality textures for games
  • Adapting your models for use in video games
  • Authoring custom levels
  • Modeling low-poly game assets (including cars) and selling them online

Robin’s writing is accessible and easy to follow. He packs a lot of information into each page, but manages to keep the tone friendly and even funny at times. While the book’s in black and white, color versions of the images are available from the publisher’s website.

Posted by Aidan Chopra, SketchUp Evangelist

Wednesday, December 7, 2011

The more the merrier: Introducing Sketchup Ur Space

One of my new favorite sources of SketchUp inspiration and information (inspormation?) is Sketchup Ur Space. A virtual smorgasbord of articles, tips, forums and imagery, this website is sure to make you smile. There’s a monthly PDF magazine, too. The creator of Sketchup Ur Space is Debarati Nath, an India-based writer who shared some information about herself and the new site:


What am I doing in the arena of 3D?

My name is Debarati Nath and I have done a degree in Mass Communication. Well, I am not a geek, in no terms so, when I started out working with SketchUp I had only one consoling factor. I had read that SketchUp – a 3D designing tool is for every person and not for geeks alone. Indeed after working with SketchUp for some time now I have realized that even a common person can draw anything from a nail to Burj Khalifa using this designing tool. Thus my work soon became my passion and I wanted to promote the thought of SketchUp to the common masses and of course to the 3D designers all around the world.

Sketchup ur Space Magazine Gets Its Own Website

I joined the company SketchUp 4 Architect as a content writer last year. Our company was outsourced SketchUp work and we started out by launching our magazine on www.sketchup4architect.com. This magazine is published in two versions flash and pdf. Soon the magazine became immensely popular and we decided to launch an independent site for the magazine. With this idea the www.sketchup-ur-space.com was launched in March 2011.

Progress of Sketchup ur Space as an Editor

In the earlier days the magazine had to travel through troubled waters. Many hardships had to be borne. But soon the magazine earned me many friends. Our journey was made smooth thanks largely to the help and support from Jim Leggitt, Bonnie Roskes, James Hanningan, Nomer Adona, V-Ray/Chaos Group, AR Media and many other friends.

Goals That Push Us On

Our motto is same as SketchUp. We want ‘everyone to experience the power and fun of building their ideas in 3D’. Sketchup ur Space always wants to lend its helping hand to the budding SketchUp designers by providing various tutorials, tips and tricks. We want to be a piazza for all the SketchUp artists all over the world. We would like to provide them a common platform to share their views and opinion. Newbie as well as renowned SketchUp artists, geo modelers, architects and SketchUp writers are featured in our magazine. Recently Sketchup ur Space had organized a SketchUp Competition to boost the SketchUp spirit of young designers with V-Ray/Chaos Group to mark our first anniversary.

Hope that you can add more power to SketchUp and help to make it best designing tool. Connect to Sketchup ur Space Magazine and be a part of our future vision.

LET US HELP DESIGN 3D DREAMS NOT WITH SUPPOSITION BUT WITH PRECISION!

I love that last sentence—I’m thinking about having it tattooed on my forehead.

Tuesday, November 22, 2011

Getting a better view of small interior spaces

When you’re modeling a small room, it can be a pain to see what’s inside. The problem is that the walls and ceiling get in the way. One solution is to lop off the ceiling and work in a top view, dollhouse-style. Other folks set up scenes from the interior corners and adjust their Field of View to something super-wide like 90 degrees.

Looking at a small interior space from the outside isn't very rewarding.

Deleting the ceiling and switching to a top view is useful, but fiddly.

Standing in the corner and making your Field of View really wide is just weird. What are you—a housefly?

Both of the above techniques work—to a point. Personally, I think it’s like trying to read a book through a keyhole. By far my favorite method for working on small interiors is to make use of SketchUp’s ability to have faces with different materials on each side:

The face separating Susan and Sang is yellow on one side and green on the other.


Creating a completely transparent material and painting the green side makes it see-through.

The Entity Info dialog box shows that the selected face is yellow on the front and see-through on the back.

By painting the outward-facing surfaces with a see-through material—one whose opacity is set to 0%—I can see in from the outside. Super useful, super simple.

Here, I painted all of the outward-facing surfaces with a transparent material. Notice that the interior surfaces still look opaque?

Orbiting around my model, I can see through all of the walls. I can even see through the floor.

Thursday, November 3, 2011

New Getting Started Videos for SketchUp

Our Official Training Videos have been responsible for teaching literally millions of people to use SketchUp. Concepts of SketchUp, the first video in the old series, has been viewed over 7 million times. Collectively, people have spent something like 40 years watching that video. That’s a lot of popcorn.

As popular as they were, our old videos were getting a little long in the tooth; they showed SketchUp 6. We decided that they should be remade, so we locked Tyson in a closet with a computer and a pile of army rations. It worked—our new training videos are not only current, they’re gorgeous. With Tyson’s scripts and visuals (and Alex’s melodious narration), getting started with SketchUp has never been easier. Here they are, in order:


One more thing: We didn’t stop at the videos. We gave the whole SketchUpVideo YouTube Channel a facelift. With helpful navigation menus in the upper-left corner, a new masthead and a big, blue Download button right at the top, SketchUp’s home on the world’s biggest video sharing site is now a whole lot lovelier. Pop on over when you get a chance.


Friday, October 21, 2011

The right way to use Follow Me

When it comes to using the Follow Me tool, most folks have it wrong. There are actually two different ways to use Follow Me, and for complex extrusions, one works way better than the other.

Follow Me: The Hard Way
In most cases, the wrong way to use Follow Me is to activate the tool, click the face you want to extrude, and attempt to drag it along a set of edges. For complicated extrusion paths, this can be painfully inefficient.

Follow Me: The Right Way
Next time you need to extrude a face along a path, use Follow Me this way:

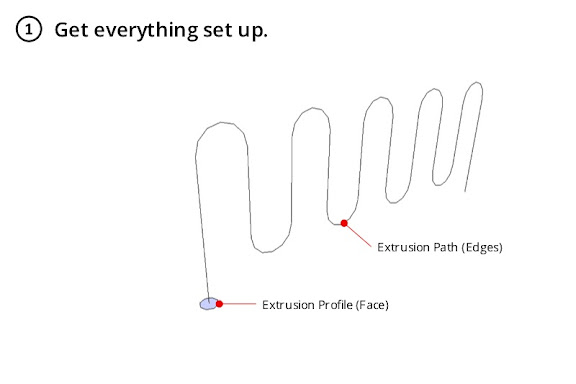
  1. Make sure your extrusion profile (a face) and your extrusion path (one or more edges) are set up the way you want them to be.
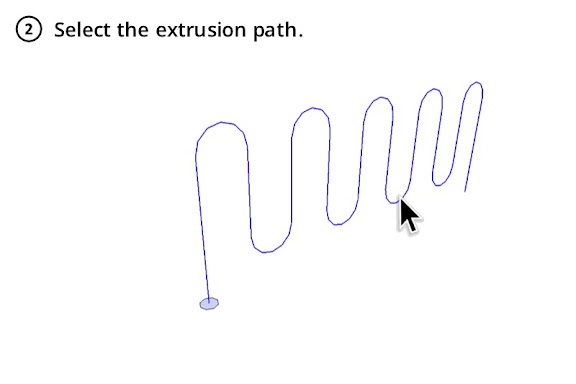
  2. Select (with the Select Tool) the edges that make up the extrusion path you want to use.
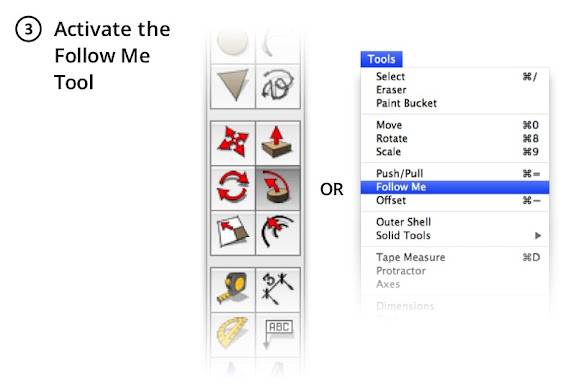
  3. Activate the Follow Me Tool by clicking its icon or choosing Tools > Follow Me. When you active Follow Me, the edges you selected in Step 2 will appear to deselect; they won't be highlighted anymore. Don't worry, though -- they're still selected.
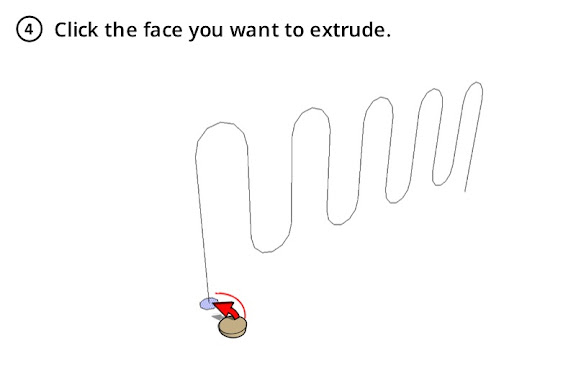
  4. Click (with the Follow Me Tool) the face you want to extrude.
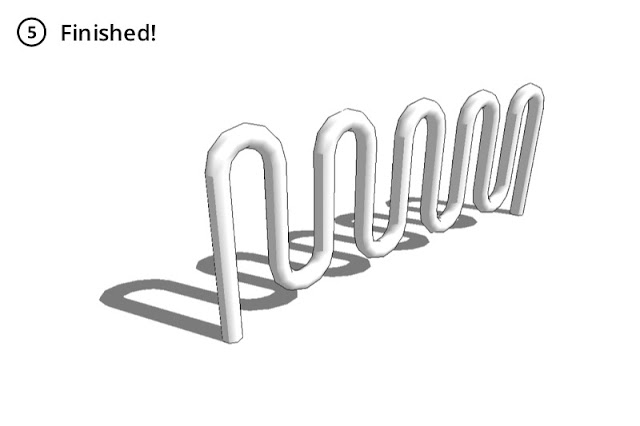
  5. Everything happens in a flash. Voilà!


That’s all there is to it. You can take your time selecting exactly the edges you want. You can orbit, zoom and pan in order to select a complex three-dimensional path. No more cussing and sweating while you try to get the extrusion to go exactly where you want it to. Sometimes a little knowledge can save a lot of headache.

Wednesday, October 19, 2011

PULSE-pounding visuals from Hollywood artist Harald Belker

Odds are, you’ve encountered Harald Belker’s work before. As a leading Hollywood concept artist, Harald is the man behind several iconic movie vehicles. His vehicular creds include:

  • The Batmobile from Batman & Robin
  • The Lightcycle from TRON: Legacy
  • The Lexus 2054 and Mag-Lev vehicles from Spielberg’s classic, Minority Report

  • The guy's got serious game.


    So you can imagine our delight when our friends at Filter Foundry told us that Harald was using SketchUp extensively on his latest project, PULSE: the complete guide to the future of racing. We immediately reached out to Harald who happily agreed to tell us more.
    “I can somehow just create in SketchUp,” Harald explains. “It allows me to visualize my ideas very quickly, giving me free range to explore. I literally use SketchUp the way I used to sketch with a pencil.”

    Harald starts with a SketchUp model and uses Photoshop to bring it to life.

    He continues, “SketchUp allows me to very easily create an environment for any vehicle I have designed. The typical application for SketchUp is to model something in 3D, set up the perspective, export the image and use that as an underlay for an illustration in Photoshop.”

    This evolution of a space through SketchUp and Photoshop.

    Speaking more broadly about SketchUp’s role in the movie industry, Harald tell us that “once it caught on, it spread like wildfire. Now everybody I know is using it.”

    He continues, “Since a lot of people I work with are using SketchUp, it’s a great crossover platform, too. I can model something in SketchUp and I can send that file to somebody who adds something else to it, and it sort of becomes this thing that everybody adds to.”

    An electric race from the pages of PULSE.

    Thankfully, Harald believes it’s the “natural obligation” of an industry vet to share acquired knowledge, and to make good, he’s posting a series of SketchUp quick tips on Filter Foundry. His first tip shows “how easy it is to create good tires in SketchUp.” Stay tuned for more.

    Harald is offering SketchUp tips on Filter Foundry.

    As a final note, it’s worth mentioning that Harald got into SketchUp the way most of us did: by modeling (or at least attempting to model) his own house.

    Like most, Harald first used SketchUp to design his house.

    “The way I learned SketchUp was on a tip from a friend, who said to just make your own house in SketchUp.” With a big grin, Harald continues, “Before I was even close to finishing my own house, I started designing my dream house. It ended up being 15,000 square feet. It’s a little big, but there’s nothing wrong with dreaming big.”

    We’d like to thank Harald for taking the time to chat with us; thanks also to our friends at Filter Foundry for making this story possible. To see even more of his work, check out Harald’s pad on Filter Foundry or visit his personal site, haraldbelker.com.

    Posted by Gopal Shah, SketchUp Marketing

    Tuesday, October 4, 2011

    Speed Up SketchUp: Use Fast Styles

    You might not realize that the display settings you choose to apply to your models can affect SketchUp’s speed and general responsiveness. Turning on fancy edge effects and other doodads will slow you down when your model gets big.

    When you’re working on a big model, you want to make sure that you’re using a style whose Edge Settings panel looks like the one in the image below. Everything but "Edges" should be turned off.

    The Face Settings panel is where you can choose not to display Transparency. When Transparency is turned on, SketchUp has to redraw your model on the screen several times—each time you change your viewpoint. If you don’t need to see through your windows just now, opt to temporarily view these faces without transparency.


    The Background Settings panel is handy for turning off Sky and Ground, both of which cause your computer to do extra thinking while you’re working.


    Unless you absolutely need them, you should use the checkbox in the Watermark Settings panel to turn off Watermarks.


    The only toggles in the Modeling Settings panel you really need to worry about are the ones for Hidden Geometry and Section Planes. Obviously, you shouldn’t have wither of these displayed if speed is what you’re aiming for.


    Once you’ve configured your own fast style, you should save it. Just give it a new name (I suggest “Fast Style”), hit Enter, and click the Create New Style button in the Styles Browser. You new style is saved in the "In Model" collection of styles, which is only associated with the model you’re currently working on.


    Incidentally, almost all of the choices in SketchUp’s Default Styles collection are so-called “Fast styles” — their Edge Display settings are already configured for speed. Choosing any one of these styles will switch off extraneous effects.


    Make a Fast Scene

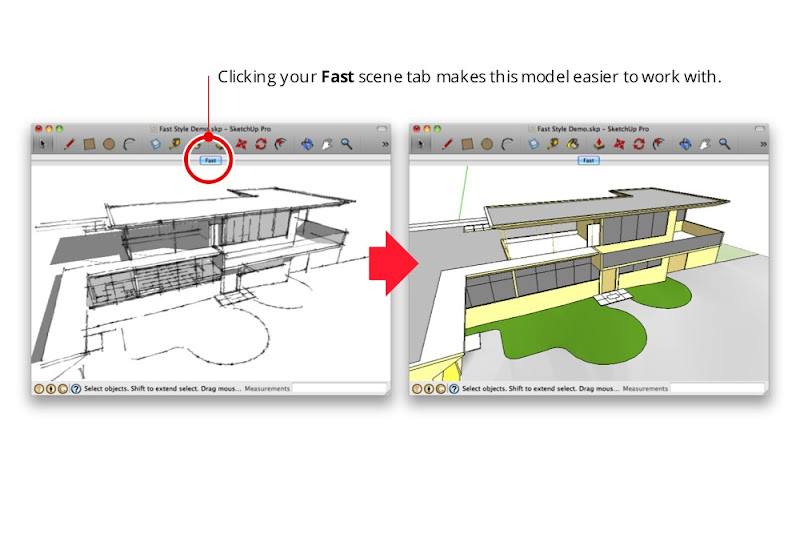
    True SketchUp whizzes invariably go one step further and add a special “Fast” scene that they can activate whenever they need to. Rather than having to mess with the Styles Browser every time they want to activate their Fast Style, they just click a scene tab at the top of the modeling window. This Fast scene is usually set up to do three things: Switch to a Fast style, turn off Shadows, and turn off Fog.

    Follow these steps to add a Fast scene to your model:

    1. Apply a Fast style to your model by choosing it from the Style Browser’s Select tab.
    2. Make sure Shadows and Fog are both turned off. These toggles are in the View menu.
    3. Choose Window > Scenes to open the Scenes Manager.
    4. Expand the Scenes Manager by clicking the Show Details button in the upper right corner.
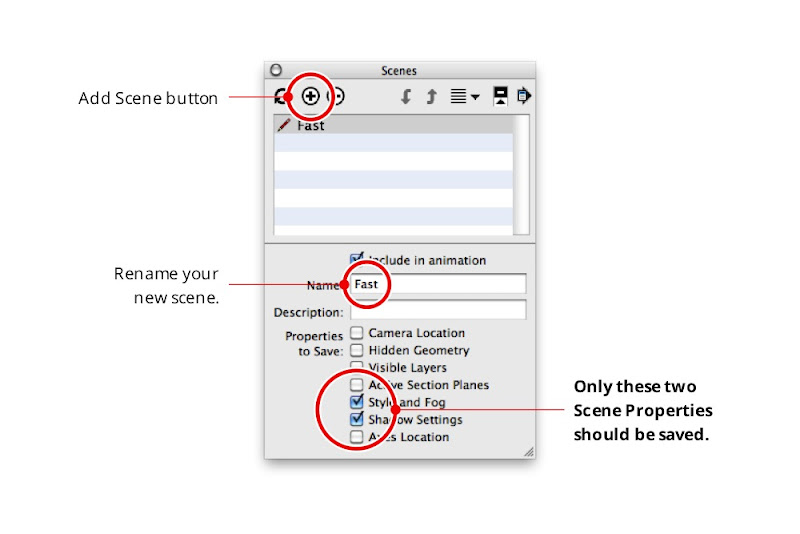
    5. Click the Add Scene button to add a new scene to your model.
    6. Rename your new scene “Fast” (or something similarly descriptive) and hit Enter on your keyboard.
    7. Make sure that only the “Style and Fog” and “Shadow Settings” checkboxes are selected in the Properties to Save section of the Scenes Manager.

    From now on, all you have to do is click the "Fast" scene tab when you want to improve SketchUp's performance. Instant productivity boost!

    Related Posts Plugin for WordPress, Blogger...