Showing posts with label Add-ons. Show all posts

Thursday, September 13, 2012

Modeling SketchUp roofs on a click with Build Edge PLAN

If you’ve ever taught someone to use SketchUp, you’ve probably drawn the basic SketchUp house and then breezed over the details when it comes to detailing the roof. The truth is that designing roofs is not always a straightforward task, even for experienced modelers.

We’ve explored some solutions for boosting roof design productivity on this blog, and today we’re happy to share a new plugin, Build Edge PLAN, that employs a bit of BIM for quickly creating dynamic walls and roofs. Here’s a quick look at how it works, courtesy of Aaron from Build Edge:


If you couldn’t sit still for the video, here’s the skinny: Build Edge PLAN plugin makes it easier to...

Draw Walls: Rather than outlining walls in a 2D view, and using Push/Pull to extrude them to full height, PLAN can draw complete 3D walls based on your desired dimensions. Each wall can be input as quickly as drawing a single line.

Edit Walls: Even if you are precise when it comes to grouping objects and creating components, modifying walls in an existing structure can be a trying process. With walls created by BuildEdge PLAN, you can move one wall, and all of the attached walls (not to mention the roof) will stretch to stay connected.

Model Roofs: Modeling a pitched roof in 3D is not a straightforward task. Properly projecting surfaces so that they intersect each-other to form a proper roof is time consuming, and if you want to model for framing, including proper heel heights and overhang geometry can be a challenge. BuildEdge PLAN simplifies the process by generating roof geometry from a simple roof outline. Just specify the slope and heel geometry of each side of the roof, and the plugin does the heavy lifting. PLAN also lets you set properties of each roof side individually, so there is plenty of wiggle room for customization.

Roof Creation in Build Edge PLAN: Roofs are created by outlining their profile; selecting individual sections allows for customization

Edit Roofs: Since BuildEdge PLAN recognizes walls and roofs as they are input, you can modify the house as a whole, and move walls or change properties of a roof on the fly. This allows you to quickly change the look of the entire house or any individual properties. For instance, switching from a hip to a gable is literally a single click.

Currently, Build Edge PLAN is only available for PC (a Mac version is in the works). The folks at Build Edge have some quick tutorials to get you going and are pretty great about helping modelers to get the most out of their plugin; give it a try, and the next time you teach someone SketchUp, don’t skimp on the roof.


Posted by Mark Harrison, SketchUp Marketing

Tuesday, August 7, 2012

Save the date for 3D Basecamp 2012

If you sometimes try to orbit the spreadsheet you're working on, you're one of us. If the phrase "Follow Me that profile along this edge" makes sense to you, you're one of us. If building a model is easily the best part of your workday, you're one of us. We're people who really, really like SketchUp, and every couple of years, we get together to meet, learn and be inspired.

The fourth-ever SketchUp 3D Basecamp is scheduled for October 15, 16 and 17 of this year. It's happening in our hometown of Boulder, Colorado, and everyone's invited. We haven't ironed out all of the details yet, but we thought we'd let you know so you can mark your calendar. It's the most fun you'll have this year.

Want us to let you know when more information is available? Click the red button!

The video below is a recap of the goings-on from our last 3D Basecamp in 2010. As you can see, a great time was had by all:


Thursday, July 26, 2012

Announcing the Madrid SketchUp Plugin Conference

When someone writes a plugin for SketchUp, he or she isn’t just looking to cram a few more icons into your toolbar. Plugins help users solve important design and workflow problems, so plugin developers have to be as keyed into the needs of SketchUp users as we are. Our Ruby API is a canvas, but it is the ingenuity of developers that makes the plugin community truly remarkable.

Today, I’m happy to announce that Íscar, the Spanish SketchUp Pro reseller and Authorized Training Center, is hosting the first-ever SketchUp Plugin Conference this fall.

The details:
Íscar’s conference will take place September 5th - 7th, 2012 in Madrid, Spain. The event is focused on the needs of plugin developers, distributors and resellers, though it’s open to everyone. The conference will be a venue for developers to present their plugins, share tips with other plugin authors, and even find new distribution channels for products. Users will see demos of the latest and greatest plugins, and have a chance to compare notes with people from around Europe and the rest of the world.

This conference is not being organized by the SketchUp team but we are co-sponsoring it, and a few of us will be in attendance. We may even cook up a presentation or two.

Register for the conference here. Questions? Check out this FAQ.

Posted by Chris Cronin, SketchUp Business Development

Tuesday, March 20, 2012

Mechanical design for everyone: SpaceClaim 3D Direct Modeling

SpaceClaim is a solid modeling application with a goal similar to SketchUp: make a 3D mechanical design tool so easy that anyone can use it. We helped the SpaceClaim team read and write SKP files years ago, but their latest release is a big step forward for engineers who are looking to use SketchUp in their workflow.

With SpaceClaim, engineers can convert conceptual designs in SketchUp’s native SKP format (which is optimized for fast performance) into precise solid models needed for mechanical design and manufacturing. As an example, SketchUp models usually convert to CAD programs as meshes, so holes end up being made of lots of little faces. SpaceClaim uses its feature recognition technology to convert these features into exact cylindrical surfaces.

Take the model below: SpaceClaim’s SketchUp import tools automatically convert facets to precise geometry when possible. On the left is the original SketchUp geometry. The middle model demonstrates the new import capability, with no manual cleanup. And the model on the right is further improved using SpaceClaim’s manual repair capabilities.

Moving from concept to production model with SpaceClaim for SketchUp

With this functionality, mechanical designers can directly re-use SKP files, rather than remodeling from scratch. This type of precision is important for rapid prototyping, laser cutting, CNC machining, detailed dimensioning, simulation, and photo-realistic rendering. And SpaceClaim’s process produces models that are completely compatible with other mechanical CAD systems. Another bonus: these import tools enable mechanical engineers to use the entire 3D Warehouse as a starting point for their designs.

If you'd like to try SpaceClaim, please visit their website.

Posted by Gopal Shah, SketchUp marketing

Tuesday, February 7, 2012

Pro Case Study: Turner Construction and the WTC, Part 2

In the second installment of our three-part series profiling Turner Construction Company, we turn our attention to the plugins Turner is developing to increase efficiencies across the global organization. Jim Barrett, Director of Integrated Building Solutions, explains:

The National Turner Virtual Design and Construction (VDC) team has developed several SketchUp plugins in Ruby to bring existing and evolving VDC processes into the simple, efficient and visual environment of SketchUp Pro.

A proprietary plugin for steel modeling and tracking was created to accelerate the use of Building Information Modeling (BIM) at the World Trade Center Transportation Hub. The tool was written to batch convert single line framing plans into 3D steel sizes, using a standard library of parts. This tool was expanded to report steel takeoffs and is now used throughout Turner to support estimating and pre-construction services.

The Place Steel for Modeling module in Turner's proprietary SketchUp plugin

By developing our own tools on top of the intuitive interface of SketchUp Pro, we continue to increase operational efficiencies. The place steel plugin is a great example of how streamlining the modeling process by reviewing the process of modeling steel, standardizing the modeling of stock pieces, and integrating that database information into SketchUp Pro reduces redundancy as well as dimensional errors in steel sizing.

Working with several Turner offices including, New York City and Seattle, a takeoff plugin was developed to support Turner’s current approach to “Control Quantity Models” and “Gross Square Foot” takeoffs. This tool allows SketchUp models to be built for different purposes. For example, using client or business unit standards, we still achieve consistent and accurate takeoffs of square footage, count, length and volumes (using SketchUp Pro’s Solid Tools).

The Count Steel for Estimating module of the Turner plugin

Design information is still in its infancy and rapidly changing. Supporting Turner’s evolving estimating expertise, a plugin was developed to accelerate the takeoff process for conceptual estimates. This plugin allows for rapid creation of space and room plans, as well as the detailed takeoff information that is required for estimates.

The Mass Generator for Estimating module

These two takeoff plugins work together to seamlessly streamline the quantity takeoff process developed by estimators in SketchUp Pro. At Turner, we look at opportunities to develop existing processes & workflows using new tools.

A detail view of the Mass Generator for Estimating module

In this way, we aren’t teaching new workflows based on new tools as they come along (a very disruptive process for any business). Rather, we’re able to leverage the skill sets and broad knowledge bases of our VDC team to build streamlined versions of existing workflows into new tools.

In the third (and last) installment of the series, we’ll explore how Turner is using SketchUp Pro in a unique and innovative way: for safety training.

Thursday, January 26, 2012

Organic modeling made simple with Curviloft

The process of extruding one 2D profile such that it ends in another, different 2D profile is often called lofting. There’s no easy way to do this in plain ol' SketchUp, but there are plenty of plugins that make it possible. The one I’ve been obsessed with lately is called Curviloft; it's by the venerable Fredo6. If you need to learn about plugins in general, including how to install them, visit the plugins page on our website.

Curviloft lets you do three basic operations; which one you use depends on what you’re trying to accomplish. For the sake of brevity (and simplicity), I’m going to focus on only the first operation in this post: Loft By Spline.

The Basics

Let’s say you have two profiles that you want to connect together. The example below is super-simple: It’s a circle directly above a square. Here, I want to connect the two with a shape that goes directly between them. Curviloft’s Loft By Spline tool was made for just this kind of thing.

I start with two flat profiles (shapes) positioned one above the other.

Fredo6's Curviloft plugin includes three handy tools. This post deals with the first one: Loft by Spline. To use it, you need two or more profiles. These can be closed shapes (as above) or simple, unconnected edges (see the end of this post for an example).

With nothing selected, I activate Loft By Spline and click once on each shape. Because there are only two, it doesn’t matter which shape I click first. If there were more than two, I’d click in the order that I want to connect them, starting at either end. When both profiles are numbered, I click the green checkmark in the Curviloft toolbar (see below). This brings me into Preview mode, where I can see what I’m about to end up with.

Activate the tool, then click on the profiles you'd like to use as the endpoints for the shape you're trying to create. When you're done, click the green checkmark to enter Preview mode.

The Curviloft toolbar is complicated; there’s no getting around it. The good news is that you don’t have to understand what all the controls do in order to use the tool. In Preview mode, you can just click things to see what happens. There's no shame in experimentation.

The Curviloft toolbar is a doozy, but you can (and should) click buttons to see what happens. Every case is different, and some settings look better than others.

When you perform a Loft by Spline operation with Curviloft, the tool is generating two different kinds of geometry which it later combines. Intermediate profiles (left) are "in-between" 2D shapes spaced between the profiles you start out with. Splines (right) are lines that connect adjacent profiles together. They can be straight or curvy, depending on the settings you choose.

I like to fiddle with the Spline Method settings first (see below). This is where you control the shape of the vertical lines (splines) that connect the two profiles—in this case, the circle and the square. The three options that I find give the most interesting results are “Junction by connected lines”, “Bezier curves – Respect tangency (Method 2)” and “Junction by Orthogonal Bezier Curves”. By all means, try the other buttons, too; there’s gold in them thar hills.

Different settings usually produce fairly different results. Click around until you like what you see.

Playing with the Vertex Matching controls also yields some useful options (see below). Here, you’re telling Curviloft how to decide which points on the perimeter of each profile should connect to one another. In this case, the circle has 24 endpoints and the circle only has four. The tool does its best to figure out the intermediate geometry, but the Vertex Matching settings let you provide guidance. For me, the most interesting button is the one on the far right; often, deselecting “Orientate contours to their best-fit box” seems to produce better results. Click it a few times to see what happens.

To be honest, I really don't understand what these buttons do. I have eyes, though, and I can tell what looks good and what doesn't. I bet you can, too.

When you’re satisfied, hit Enter on your keyboard (or click the green checkmark on the toolbar) to finish generating the result.

I'm delighted every time I do one of these operations. Modeling this "by hand" would take so long that I doubt I'd even bother attempting it.

Cool variation #1: Twisting


While you’re still in Preview mode, clicking on black part of your preview object opens yet another set of controls. The Properties of the Edited Junction window shows you more information about the connections in the operation you’re doing. My favorite widgets here have to do with twisting; they let you rotate either of your profiles (in this case, the circle and the square) by 15 or 90 degree increments. The result is an insanely cool twisting effect. Click the little right and left arrows and you’ll see what I mean. Addictive, no?

Twisting 3D forms is one of those things that SketchUp modelers have resigned themselves to never being able to do. When I discovered this functionality in Curviloft, I got up and danced around.

Cool variation #2: Offset profiles

Loft by Spline works great on profiles that aren’t lined up perfectly, too. Below, I’ve moved and rotated the circle.

Your profiles don't have to be directly on top of one another to use Loft by Spline.

Again, trying different Spline Method settings produces pretty wildly different results.

Using straight splines connects the profiles in a very direct manner. Choosing a curvy spline method produces a much jauntier shape.

I dare you not to waste an afternoon playing with Curviloft. The other two tools in the set let you loft along a path and "skin" connected profile edges, but Loft by Spline is pretty powerful on its own. Remember that Curviloft is donationware, meaning that if you like it, you can contribute to its author; you'll find an option to do so in the Curviloft menu after you install it.

Here are some quick examples of shapes I whipped up while I was working on this post:

Both profiles are identical, but I used the twist options to spiff things up a little.

Lofting between a complex profile and a simple one can be tricky, but the smooth transition that ensues is always lovely. Rocket? Tree trunk? Bicycle handlebar grip?

Your profiles needn't be fully-enclosed faces. Try lofting between arcs and other edges to produce all kinds of things that would be painful to model without Curviloft.

I used Curviloft to model parts of this queen I'm making. Some of us on the SketchUp team are collaborating on a 3D printed chess set.

I've written about a couple of Fredo6's other terrific plugins in the past. RoundCorner gives you the ability to quickly and easily create rounds and fillets on almost any shape. FredoScale is a toolkit for stretching, bending, twisting and otherwise deforming your models in incredibly useful ways.

Tuesday, January 17, 2012

New Book: SketchUp for Game Design

I’ve yet to meet a SketchUp modeler who doesn’t—at least just a little bit—want to work in the video game design industry. I get a stupid grin on my face when I think about how much fun it it would be to make battle tanks and exploding oil drums and secret doors for hidden basements full of zombies. In the gaming world, boring things like gravity and cost take a backseat to novelty and sheer coolness.

But how to turn your SketchUp habit (and job cranking out toilet stall details) into days full of armor design and wandering through bad neighborhoods looking for interesting photo-textures to shoot?


Google SketchUp for Game Design is Robin de Jongh’s newest book; he also wrote SketchUp 7.1 for Architectural Visualization. It presumes that you’re a SketchUp beginner, but then quickly gets on to the good stuff:

  • Finding good resources for photo-textures
  • Using Meshlab to convert your models in useable 3D game assets
  • Working with the Unity 3D game engine (which is widespread, free-or-low-cost middleware for designing game levels)
  • Creating high-quality textures for games
  • Adapting your models for use in video games
  • Authoring custom levels
  • Modeling low-poly game assets (including cars) and selling them online

Robin’s writing is accessible and easy to follow. He packs a lot of information into each page, but manages to keep the tone friendly and even funny at times. While the book’s in black and white, color versions of the images are available from the publisher’s website.

Posted by Aidan Chopra, SketchUp Evangelist

Thursday, December 22, 2011

3DOn ARchitecture: Augmented Reality for iOS devices

Paul from 3DOn Ltd. presented at an event I attended a month or so ago. After his presentation, I asked him if we could tell the SketchUp community about his product, 3DOn ARchitecture. He said yes, but at the time the app was only available in the UK. Now it’s available to SketchUp users all over the world. Hooray!


3DOn ARchitecture is an augmented reality app for architects. It allows you to upload your SketchUp models and view them on an iPhone or an iPad in three different modes. Preview mode lets you overlay your model onto a photograph of your site. Walk mode lets you explore your model inside and out, and On-site mode lets you view your model in situ—in real time.


3DOn ARchitecture can be downloaded for iPhone (3GS or later) or iPad. For more information, you can visit the 3DOn website or follow the 3DOn team on Twitter.


Tuesday, December 13, 2011

Skelion: A solar energy design plugin for SketchUp

Skelion was designed to make working in SketchUp quite a bit easier for solar professionals. It features the ability to automatically insert solar panels on SketchUp surfaces. Because the developers are solar professionals themselves, I have a feeling others in the industry will find this plugin quite useful. I had a chance to ask one of Skelion’s developers some questions:

Please tell us a little bit about yourself.

Well, I am Sam Jankis, industrial engineer and co-developer of Skelion, although my partner is the real code developer of the plugin: Juan Pons is a Spanish engineer and programmer. Skelion was born in July 2011 after two years of development. It is a plugin for Google SketchUp that allows you to, among other things, insert solar panels on surfaces automatically.

Why did you build Skelion?

Skelion was developed to automate the design of solar systems using Google SketchUp. The goal was to do all the design work we were doing, but automatically. Now we can do with four clicks what we were doing in four hours. Skelion reduced considerably our average time expended on doing layouts and energy production reports of solar systems, and allowed us to multiply by four the preliminary studies we could do.


How does it work?

Basically, you select a surface where you want to insert solar panels and click on the solar cell logo. A menu appears that asks you about tilt and orientation for the panels, the type of panel, and a shading range for a given day. Photovoltaic panels can be selected from our database or you can create your own, and they can be placed in portrait or landscape orientation. After that, the plugin automatically inserts the solar panels on your selected surface. It also works with irregular surfaces. For more information, take a look at our video tutorials.


What are your goals for the plugin?

The goal for Skelion is to become a standard design tool in the solar industry. We believe that as soon as solar designers get familiar with the plugin they are going to love it—as we do.


How can SketchUp modelers try Skelion?

They can download the plugin from our download page. The Free version includes the most powerful feature: the automatic insertion of solar panels. With the Pro version, you get some interesting and useful features such as energy reports.


Thursday, December 8, 2011

Making your models more useful with Trelligence Affinity

Some architects begin new projects by creating a “bubble diagram” that turns the program — the list of space requirements for a building—into a set of shapes. Mostly, these diagrams are useful for figuring out adjacencies and loose spatial relationships. They’re really about translating information in spreadsheets into something that can begin to inform decisions about space, form, structure and all the other good stuff that makes buildings worth building.

Over time, we’ve seen an awful lot of architects use SketchUp Pro as a tool for making more-accurate bubble diagrams. They create “rooms” whose areas match the ones in the program, group each one, and arrange them three-dimensionally. The results aren’t buildings, per se—I prefer to call them shoebox models. They can be very useful, but there’s a catch: once a room changes size, there’s a disconnect between the spreadsheet (which is what the client is asking for) and the nascent design.

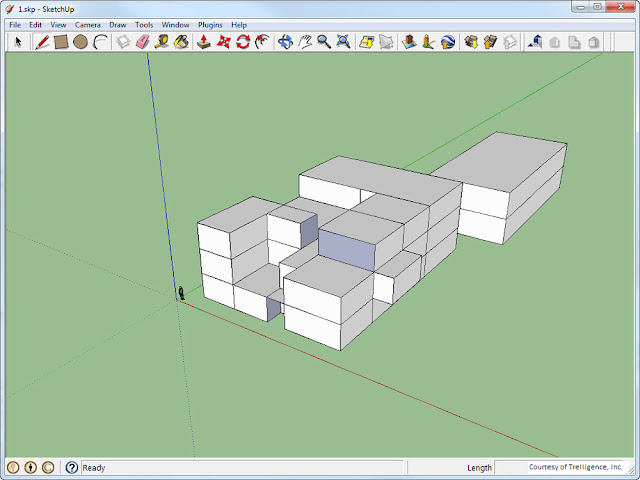
That’s where the SketchUp interoperability in Trelligence Affinity comes in. Affinity is Windows software made specifically for the architectural programming and schematic design phases. It includes neat tools for visualizing program information in different ways and using that information to guide your design. The new Affinity plug-in for SketchUp lets you easily connect your shoebox model to Affinity, creating a permanent connection between the model, the spreadsheet and all the underlying data about the building requirements. Forgot to include a conference room? Inadvertently doubled the size of the cafeteria? Affinity will let you know. The workflow is actually bi-directional; you can begin in either SketchUp or Affinity.

You can start with a programmatic massing model in SketchUp. I like to think of these as 'shoebox models'.

Scanning your model with the Affinity plugin assigns it useful metadata.

In Affinity, you can view the scanned SketchUp model in different ways.

The architectural program in Affinity can be linked to your SketchUp model.

This video tells the story quite nicely:


To download the plugin and get more information, check out the plugin page.

Thursday, December 1, 2011

Another important update for SketchUp 8

In the world of software, the designation “M2” refers to “Maintenance Release #2”. Maintenance releases are mini-versions that come out between major updates. They aren’t really about flashy new features; they’re more like tune-ups for your car; squeaks and rattles get fixes, tires are rotated, fluids are changed. You get the picture.

It’s been a few months since we released M1; since then, we’ve collected a fresh batch of performance tweaks and bug fixes—over 150 of them, in fact. M2 is a free update for all users of SketchUp 8 and SketchUp Pro 8 in all 12 languages. The best way to get it is to open SketchUp and do this:

Windows: Choose Help > Check for Update
Mac: Choose SketchUp > Check Web for Update

Having stated that maintenance releases aren’t always flashy, we couldn’t resist adding a few shiny, new things that we think you’ll appreciate:

Better Ruby Script Installation

We’ve had a way for other folks to build SketchUp plugins and extensions for years. Anyone with coding skills can use the Ruby API (application programming interface) to whip up new tools that they can distribute any way they like. People have created thousands of great scripts—we consider the API one of the most useful things we’ve done.

The tricky part has always been teaching SketchUp modelers how to install and access the Ruby scripts (Rubies) that they want to use. Adding a sophisticated Ruby used to involve finding a specific folder on your system and putting a bunch of files in all the right places. Try explaining how to do that to your boss.

The Extensions panel in SketchUp Preferences has a new button...

In SketchUp 8 M2, we’ve added two features that should make using Rubies a whole lot easier: The first is a new button on the Extensions panel in SketchUp Preferences. Clicking it lets you install any properly-configured ".RBZ" (ruby zip) file, which puts the needed files into the correct spot, without having to dig around in your computer’s file system. It’s simple, but huge. We’ve also added a lightweight set of “hooks” in the API that should help scripters build their own script-management tools.

Better COLLADA

All versions of SketchUp 8 can read and write COLLADA, a 3D file format that works with lots of other 3D software. It’s managed by the Khronos Group, an industry consortium that decides which features COLLADA should support. As of M2, SketchUp’s import/export support for COLLADA is now compliant with over 90% of the official Khronos compatibility test suite, only leaving out support for animations and shaders—neither of which can be authored in SketchUp anyway.

We think you’ll like SketchUp 8 M2’s ability to seamlessly import and export clean and compliant COLLADA geometry. One particular thing to note: SketchUp now preserves texture names in exported files. This makes it easier to work with COLLADA files in 3rd party rendering tools.

Advanced Camera Tools included in Pro

Back in March, we announced the Advanced Camera Tools for SketchUp Pro 8. The ACTs let set designers, cinematographers, storyboard artists and other people in the entertainment industry work with simulated real-world cameras in their SketchUp models. Until now, the ACTs were a separate plugin that you had to install. In M2, they’re built right into every copy of SketchUp Pro 8.


More Straightforward Pro Trials

After you download and install SketchUp Pro, you can try all of the Pro features for 8 hours (of use) before deciding to buy a license. Up until now, we’ve simply switched off the Pro stuff if you don’t enter a license after the trial period. Effectively, Pro reverted to being just like regular ol’ SketchUp.

The problem was that lots of people didn’t realize that they weren’t actually running Pro anymore. Even worse, folks who had bought Pro licenses and had forgotten (or otherwise been unable) to activate those licenses were missing out on all the great stuff they’d paid for. Our Pro Support team has been fielding dozens of “Why can’t I import a CAD file?” questions per day. It’s been a bit of a mess.

Starting with SketchUp 8 M2, the SketchUp Pro Trial will no longer revert to “free mode” when the trial period expires. A separate version of SketchUp will still be available to download for free, but SketchUp Pro will require a valid license file to run after your trial period has expired.

Mac OS 10.7 Compatibility

Users of Apple’s latest operating system, take note: SketchUp 8 is fully compatible with your hardware. And I ain’t lion. Rawr.

Wednesday, November 30, 2011

SITEOPS: Conceptual design for land development

Back in architecture school, I once had to lay out a parking lot for a building I was designing. What a terrible, terrible exercise in nitpicky details and perpetual re-arrangement. The solution I came up with accommodated all of four Smart cars and a unicycle. Awful. If only I’d had access to a tool like SITEOPS from BLUERIDGE Analytics.

SITEOPS is conceptual land development software for folks like architects, civil engineers, landscape architects and land developers. After you’ve brought in a site, you can combine building footprints with critical elements like parking, islands and driveways. These elements are parametric, meaning that they re-draw themselves on the fly as you change aspects of your conceptual design. SITEOPS even provides budget tools for estimating the cost of a project.

Want to see what a parking layout might look like if your building were on the other side of the site? As you slide it over, the parking lot automatically reconfigures to maintain the proper number of spaces. Too cool. This short video shows SITEOPS it in action:


Realizing that lots of their users are also SketchUp devotees, the good people at BLUERIDGE have added an Export to SketchUp button to their product. It lets you figure out the complicated stuff in SITEOPS, then visualize your project in SketchUp. It’s available to SITEOPS customers who have also purchased the Grading and Piping Module. These pictures tell the story better than words can:

This is a view of a 2D site layout in SITEOPS.

A 3D image of the same site in SITEOPS' Grading and Piping Module.

The site after it's been exported to SketchUp. The model includes all of the 3D topographical information from SITEOPS.

Here’s a video that features a couple of SketchUp users talking about their impressions of SITEOPS’ new SketchUp integration:


Update: The folks at BLUERIDGE Analytics are offering a free webinar about using SITEOPS with SketchUp Pro. It's scheduled for 2:00 PM EST on Wednesday, January 11th, 2012. Sign up if you're interested—the webinar also carries 1 PDH or 1 LU.

Wednesday, November 9, 2011

Introducing Maxwell for Google SketchUp

Among rendering die-hards, the name “Maxwell” has long been synonymous with jaw-dropping realism. Maxwell Render’s makers have offered a SketchUp-to-Maxwell solution for a few years, but it required modelers to have access to Maxwell Render Suite—the full, standalone version. For SketchUppers on a budget (or who only need to make the occasional rendering), this wasn’t an ideal arrangement.

A delicious Maxwell render by Rune Skjøldberg.

To accommodate more people, the folks behind Maxwell have just released something they’re calling Maxwell for Google SketchUp. It’s a dedicated photo-renderer, based on the venerable Maxwell rendering engine, that operates entirely inside of SketchUp. Best of all, it has the Big Three qualities going for it:

  • Cross-platform. It works on both Windows and Mac systems.
  • For both free and Pro. It works on both SketchUp and SketchUp Pro.
  • Two entry points. There are free and licensed versions available.

As you can see in this straightforward feature matrix, the free version allows you to render in Draft mode and limits your resulting image to a resolution of 800 pixels. The Licensed version adds Production mode (faster rendering of complex lighting) and increases your maximum output resolution to 1920 pixels. At only $95/75€, the paid version is a bit of a bargain.

Another render by Rune Skjøldberg showcasing multiple light sources.

If you’re looking for all the bells and whistles and extra pixels that Render Suite offers, the “bridge” plugin for sending your SketchUp model to R.S is still available. So really, SketchUp modelers who want Maxwell’s delicious, unbiased results have three options. And they’re all good ones.

Posted by Aidan Chopra, SketchUp Evangelist

Monday, September 19, 2011

Free training webinars about 3D printing from Ponoko

Just a heads up: The good people over at Ponoko are planning to hold an Online Training Extravaganza to get newbies up and running with their "personal factory" workflow. If you're interested in 3D printing, laser cutting or CNC routing, this is for you. They're giving discounts on their services just for registering. And since it's online, you don't even have to change out of your pajamas to attend. Bonus!


Two of the 3D printing presentations focus on using SketchUp; they're free, but you need to register beforehand. They're currently scheduled for:

  • Tuesday, September 20th at 3pm Pacific Time | Register
  • Tuesday, October 4th at 3pm Pacific Time | Register

The sessions on laser cutting and CNC routing both use Adobe Illustrator, but that's alright -- SketchUp Pro can export to DXF and DWG, both of which open beautifully in Illustrator. Scroll down to the bottom of the page to see all the sessions.

Just in case you missed it, here's a SketchUp & Personal Fabrication overview we put together a few months ago.

Wednesday, September 7, 2011

Shaderlight V2 is now available

Our friends across the pond at Shaderlight would very much like you to know that they’ve just released Version 2 of their intuitive, affordable rendering tool for SketchUp. I’m no rendering guru, and I certainly haven’t tried all the alternatives, but I can truthfully say that Shaderlight is responsible for the only successful photo-realistic rendering I’ve ever made. That (and a soupçon of Photoshop) resulted in the following less-than-masterful example of stunning SketchUp realism:


The important things to note are that a) I’d never rendered a 3D model before, and b) this only took me a couple of hours to figure out. Photo-realistic rendering is still far from easy, but Shaderlight gives dopes like me a fighting chance.


The newest version of Shaderlight includes two major new features. The first is something called Replace Me. It lets you model with low-poly “proxy” objects, but then specify deliciously high-poly substitutes that Shaderlight uses when it renders. You get the best of both worlds: speedy performance in the model and better realism in the render.

The other new hotness is Rendered Animations. Shaderlight can use SketchUp’s scene-based animation settings to automatically create a photo-rendered video. Too cool. Congrats to the team at ArtVPS on getting this update out the door. It looks great.

Until the end of September, new customers can save 25% on Shaderlight Pro licenses. The promo code to use at checkout is 09PROMO.

Tuesday, September 6, 2011

Visualizing circuit boards with SketchUp and the PCB Converter

In the world of electronics, designing a stylish, functional and ergonomic product casing around a complex circuit board—with its chips, connectors, buttons and displays—is a critical step. As it turns out, SketchUp can help in this process.

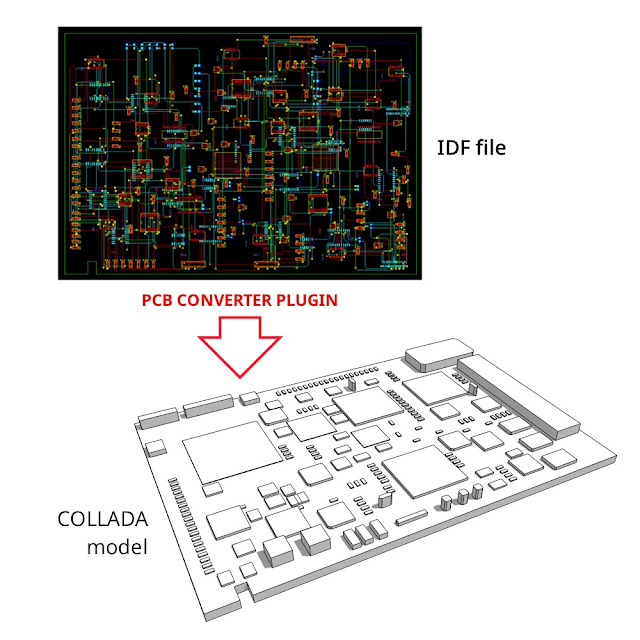
Recently, RS Components (Europe's leading high-service distributor of electronic components) developed the PCB Converter plugin for SketchUp. Its function is to convert IDF files from most 2D circuit board design applications (like their own DesignSpark PCB) to COLLADA, which SketchUp can read and write.

The PCB Converter plugin converts IDF v3.0 circuit files into COLLADA that can be brought into SketchUp to validate for proper fitting.

Mark Cundle of RS Components was good enough to help explain how the PCB Converter can help in the design process:

In the typical electronic product design process, the mechanical engineer defines the board shape, specifies important regions and pre-places critical components such as connectors, switches and displays in a 3D MCAD system. This information is passed to the circuit designer via an IDF file to be used as the basis for the board layout in a 2D ECAD system to create the circuit board (PCB) design. The PCB is sent back to the mechanical engineer as an IDF file to ensure the board assembly fits into the final product package. The design can go back and forth between the mechanical engineer and the circuit designer many times until the PCB is finalized.

IDF is therefore extremely important for electronic product design and becoming more so as increasing miniaturisation of electronic products means spatial constraints are of growing importance and the link between electronic and mechanical engineers strengthens.

An electronic (PCB) engineer using SketchUp in conjunction with the PCB Converter for SketchUp can decrease the number of time-consuming interactions with the mechanical engineer by doing a much of the groundwork (such as checking potential collisions with mechanical components) before sending the final board design to the mechanical engineer. The collaborative process becomes much more efficient and productive for both parties, which allows for faster development.

RC Components’ intention is to lower the monetary barrier to innovation by providing tools like PCB Converter and DesignSpark PCB. Hobbyists, students and seasoned professionals can create products from board design through to mechanical design at little or no cost.


Sunday, September 4, 2011

A treasure trove of textures

If you’re into such noble pursuits as geo-modeling or photo-realistic rendering, there’s a good chance that you spend a ridiculous amount of time hunting for photo-textures online. Flickr and other photo sharing sites are goldmines for content, but who has time to compile a folder of bookmarks that point to the best ones?

Our friend John Pacyga, apparently. He’s just posted a long list of his favorite texture sources — for both SketchUp and Photoshop. Some are free, some have Creative Commons licenses, and some cost money, but all are worth browsing. Set aside some time, though; this kind of thing is addictive.

If you’ve found a seamless texture (one that can repeat attractively when you paint it on a surface), here’s how you load it into SketchUp:

Instructions for Windows:

Instructions for Mac:


I found the rock texture in the screenshots above on lee.ponzu’s Flickr Textures set. Want to make your own seamless texture images? These tutorials on YouTube are a good place to start.

Related Posts Plugin for WordPress, Blogger...